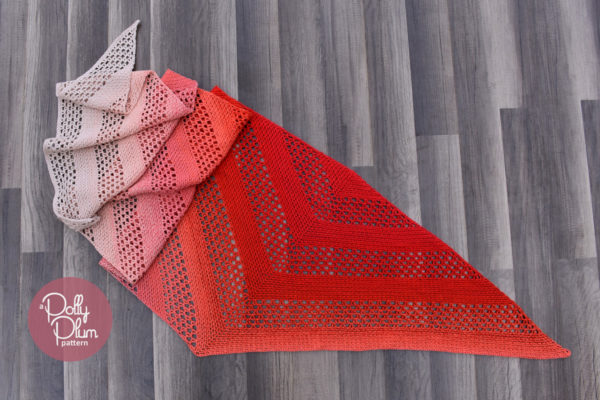
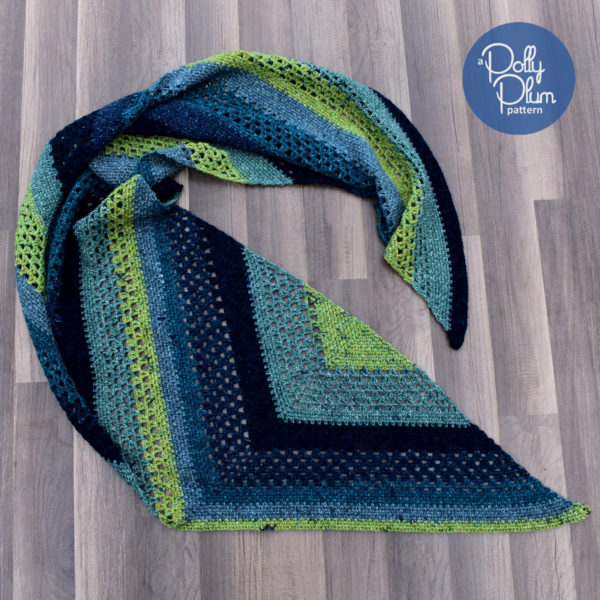
Mimic is a trapezoid shaped shawl made of simple sections of moss stitch and V stitches. It’s easy enough to work on in front of the TV, but takes an interesting turn about halfway through to keep you hooked and to keep things moving. It’s also incredibly easy to modify to your desired size or to accommodate the amount of yarn that you have available.
As written, there are two sizes to choose from. The DK weight option was made in Stylecraft Batik Swirl (colorway Blue Ocean). Two cakes were used to make a warm and snuggly wrap (or wide wrap-able scarf) perfect for brisk winters. The Fingering weight option was made in Scheepjes Whirl (colorway Strawberries & Scream). One cake was used to make a light and airy shoulder wrap for cool summer evenings or those chilly fall days.
Click here to read the blog post about Mimic.
Click here to favorite, queue, and hook up a project page on Ravelry.
Shop for your Stylecraft Batik Swirl or Scheepjes Whirl on Deramores.com. It helps me out so I can keep bringing you free patterns like this one!*
Details
Pattern written in US crochet terms
Skill level: Easy
Two Options: DK weight or Fingering Weight, both options are easy to alter for width and length
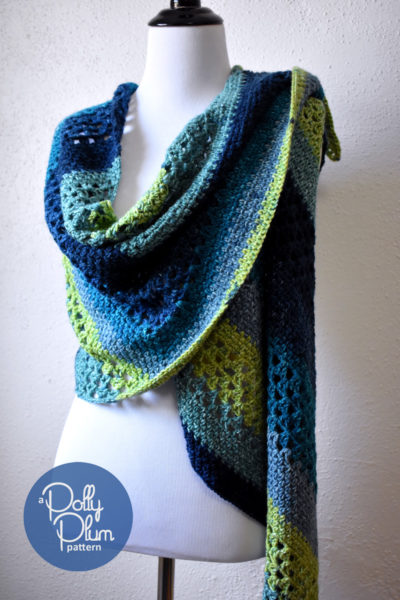
DK weight – So snuggly and wrapable!
DK Weight Option:
Finished Size before blocking: 17.5 x 77 inches at widest and longest points
Yarn: Stylecraft Batik Swirl, 2 cakes, sample made in Blue Ocean colorway
Hook: 4.5mm or size needed to obtain gauge
Gauge: About 3.5 inches from magic circle to corner after row 13; each V/moss st section measured at same point from there on out about 3.5 inches each
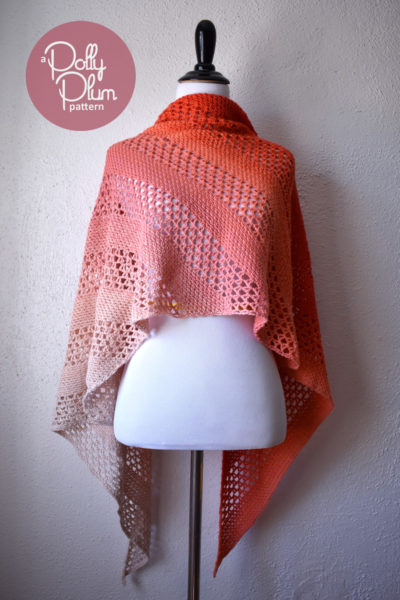
Fingering weight – just look at that drape!
Fingering Weight Option:
Finished Size before blocking: 21 x 70 inches at widest and longest points
Yarn: Scheepjes Whirl, 1 cake, sample made in Strawberries & Scream colorway
Hook: 3.75mm or size needed to obtain gauge
Gauge: About 3 inches from magic circle to corner after row 13; each V/moss st section measured at same point from there on out about 3 inches each
Alterations
This pattern is exceptionally easy to alter. Simply add or subtract sections of V and moss stitch. It’s best to finish part 1 with a section of Moss stitch. Make V and moss sections in part 2 as many times as you like or until you run out of yarn. Just be sure you leave enough yarn to make the final row(s).
It’s also incredibly easy to change up the stitch sequence to your own liking. Maybe you want short or wider sections of V or moss stitch? Maybe you want them to be irregular or different widths? There are just two rules.
- You must start with an odd number of moss stitch rows in the first moss stitch section in part 1.
- You must always add moss stitch rows in multiples of two.
If you do those two things, you can go crazy with everything else. It might be best, though, to try the pattern as written first and get creative after you understand the basic construction. What ever you do, have fun with it and make it your own!
Pattern Notes
Blocking will help open up the stitches of this shawl.
Check out the new “Print Friendly” button at the bottom of the page to print your own copy of the pattern.
If you need help or have any questions, scroll to the bottom of this page. There are links to where you can find lots of support.
This pattern is Copyright © 2018 Polly Plum. All rights reserved.
If you would like to share this pattern, please share the link to this webpage or the Ravelry pattern page (link below). Please do not distribute this pattern or the accompanying photos in any other form. Please read more in the Copyright section.
Abbreviations
- ch – chain
- dc – double crochet
- r# – row number
- sc – single crochet
- sk – skip
- slst – slip stitch
- sp – space
- st – stitch
Special Stitches
V – dc, ch1, dc
Before you Begin
Just a couple things to be aware of before you start:
You’ll want to keep the moss stitch sections loose. If they are too tight they will make the V stitch sections look saggy.
Except for the first and last stitches of the rows, the final triangle row, and the final extension row, you’ll always skip the stitches and work only into the chain spaces.
Pattern, Part 1 – the Triangle
Begin with magic circle. {Alternately, begin by chaining 1 and working row 1 into this ch as though it were the magic circle.}
Row 1: Ch1, (sc, ch2, sc) into mc. {Ch2 counts as corner here and throughout.} Close magic circle. Turn. (st count: 2 sc, 1 ch2)
Row 2: Ch1, sc into first st, ch1, (sc, ch2, sc) in corner ch2 sp, ch1, sc in last st. Turn. (st count: 4 sc, 2 ch1, 1 ch2)
Row 3: Ch1, sc into first st, ch1, sc in next ch1, ch1, (sc, ch2, sc) in corner ch2 sp, ch1, sc in next ch1, ch1, sc in last st. Turn. (st count: 6 sc, 4 ch1, 1 ch2)
Row 4: Ch1, sc into first st, (ch1, sc in next ch1 sp) twice, ch1, (sc, ch2, sc) in corner ch2 sp, (ch1, sc in next ch1 sp) twice, ch1, sc in last st. Turn. (st count: 8 sc, 6 ch1, 1 ch2)
Row 5: Ch1, sc into first st, (ch1, sc in next ch1 sp) across to corner, ch1, (sc, ch2, sc) in corner ch2 sp, (ch1, sc in next ch1 sp) across to last st, ch1, sc in last st. Turn. (st count: 10 sc, 8 ch1, 1 ch2)
Rows 6 – 13: Repeat row 5. (row 13 st count: 26 sc, 24 ch1, 1 ch2)
Row 14: Ch4 and dc in first st {counts as first V here and throughout}, ch1, (sk next ch1 sp, V in next ch1 sp, ch1) across to corner, (dc, ch2, dc) in corner ch2 sp, (ch1, V in next ch1 sp, sk next ch1 sp) across to last st {that means one ch1 sp will be unworked before the last st}, ch1, V in last st. Turn. (st count: 14 V, 2 dc, 14 ch1, 1 ch2)
Note: in repeats of row 14, the last st will be the third ch of the starting ch4, the one that counted as the first dc of your first V.
For DK size:
Rows 15 – 19: Repeat row 14 for a total of 6 V stitch rows. (st count after r19: 24 V, 2 dc, 24 ch1, 1 ch2)
Rows 20 – 31: Repeat row 5 for a total of 12 moss stitch rows. (st count after r31: 74 sc, 72 ch1, 1 ch2)
Rows 32- 37: Repeat row 14 for a total of 6 V stitch rows. (st count after r37: 48 V, 2 dc, 48 ch1, 1 ch2)
Rows 38- 48: Repeat row 5 for a total of 11 moss stitch rows. (st count after r48: 120 sc, 94 ch1, 1 ch2)
Note: you will have 5 sections that will go moss st/V st/moss/V/moss. Make sure you only repeated row 5 eleven times in the last moss st section before moving on to the final triangle row.
For Fingering size:
Rows 15 – 19: Repeat row 14 for a total of 6 V stitch rows. (st count after r19: 24 V, 2 dc, 24 ch1, 1 ch2)
Rows 20 – 31: Repeat row 5 for a total of 12 moss stitch rows. (st count after r31: 74 sc, 72 ch1, 1 ch2)
Rows 32 – 37: Repeat row 14 for a total of 6 V stitch rows. (st count after r37: 48 V, 2 dc, 48 ch1, 1 ch2)
Rows 38- 49: Repeat row 5 for a total of 12 moss stitch rows. (st count after r49: 122 sc, 120 ch1, 1 ch2)
Rows 50- 55: Repeat row 14 for a total of 6 V stitch rows. (st count after r55: 72 V, 2 dc, 72 ch1, 1 ch2)
Rows 56- 66: Repeat row 5 for a total of 11 moss stitch rows. (st count after r66: 168 sc, 166 ch1, 1 ch2)
Note: you will have 7 sections that will go moss st/V st/moss/V/moss/V/moss. Make sure you only repeated row 5 eleven times in the last moss st section before moving on to the final triangle row.
Final Triangle Row: Ch1, 2sc in first st, (sc in next ch1, sc in next sc) across to corner, 3sc in corner ch2 sp, (ch1, sc in next ch1 sp), sc in last st. Turn. (DK st count: 183 sc, 60 ch1; Fingering st count: 255 sc, 84 ch1)
Part 2, The Extension
Row 1: Ch4 and dc in first st, ch1, (sk next ch1 sp, V in next ch1 sp, ch1) across to last 2 ch1 sps, sk next ch1 sp, dc in next ch1 sp, dc in the middle sc of the 3 corner sc. Turn. (st counts will be the same for all most st rows; DK st count: 30 V, 2 dc, 30 ch1; Fingering st count: 42 V, 2 dc, 42 ch1)
Row 2: Ch3 {counts as first dc here and throughout}, dc in next ch1 sp, sk next ch1 sp, (ch1, V in next ch1 sp, sk next ch1 sp) across to last st {that means one ch1 sp will be unworked before the last st, just like in the triangle section}, ch1, V in third ch of the starting ch4 {the one that counted as the first dc of your first V}. Turn.
Row 3: Ch4 and dc in first st, ch1, (sk next ch1 sp, V in next ch1 sp, ch1) across to last 2 ch1 sps, sk next ch1 sp, dc in next ch1 sp, sk next st, dc in the last st {this will be the starting ch3 from the previous row}. Turn.
Rows 4: Ch3 {counts as first dc here and throughout}, dc in next ch1 sp, sk next ch1 sp, (ch1, V in next ch1 sp, sk next ch1 sp) across to last st {that means one ch1 sp will be unworked before the last st, just like in the triangle section}, ch1, V in third ch of the starting ch4 {the one that counted as the first dc of your first V}. Turn.
Row 5: Repeat row 3.
Row 6: Repeat row 4.
Note: That completes your first V st section.
Row 7: Ch1, sc into first st, (ch1, sc in next ch1 sp) across to last ch1 sp, sk second to last st, sc in last st. Turn. (st counts will be the same for all moss st rows; DK st count: 62 sc, 60 ch1; Fingering st count: 86 sc, 84 ch1)
Row 8: Ch1, sc in first st, sk second st, sc in next ch1 sp, (ch1, sc in next ch1 sp) across to last st, ch1, sc in last st. Turn.
Rows 9 – 18: Repeat rows 7 & 8 for a total of 12 moss st rows.
Note: That completes your first moss st section.
V st section: Repeat rows 3 & 4 for a total of 6 V st rows.
Moss st section: Repeat rows 7 & 8 for a total of 12 moss st rows.
For DK size: continue alternating between V and moss st sections for a total of 11 sections. For your final moss st section repeat rows 7 & 8 for a total of 11 moss st rows. Finish with the final extension row {below}.
For fingering size: continue alternating between V and moss st sections for a total of 9 sections {ending on a V st section}. Repeat row 7. Finish with the final extension row {below}.
Note: your own personal tension and your yarn will determine if you have enough yarn to complete all 9 sections of the fingering size shawl. The sample used all but about a gram or two of yarn. If your gauge was slightly larger than listed, make the first 7 sections then follow the instructions for DK to finish with a moss st section instead.
For your own size: continue adding V and moss stitch sections to your desired length. To finish with a moss st section follow the directions for DK size. To finish with a V st section follow the directions for fingering size.
Final extension row: Ch1, 2sc in first st, sc in next ch1, (sc in next sc, sc in next ch1) across to last two sts, sk second to last st, sc in last st. Fasten off. (DK st count: 122 sc; fingering st count: 170 sc)
Weave in ends and block.
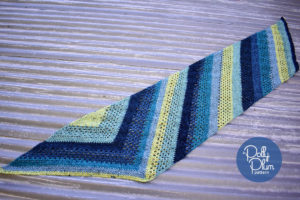
Full view of Batik Swirl version
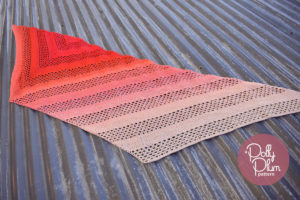
Full view of Whirl version
*This page contains affiliate links. That means I get a little bit of commission if you decide to click a link and buy something. A little bit of commission means I can keep the website going and more free patterns coming at you. So, thanks for that!
If you’d like to show your support and/or say thank you for this free pattern – the most helpful thing you can do is share a picture of your work on Ravelry or Facebook. Seriously! That’s it. If you liked the pattern, tell your friends and show them what you made.
If you’d like to see more of my work, visit the Patterns page here on Every Trick on the Hook or my Ravelry store.
The best way to keep up with my goings-on is to follow Every Trick on the Hook on Facebook. You can also message me there, post on the wall, and follow my posts for the latest news.
If you’re looking for a more interactive Facebook experience, join the Polly Plum Pattern Posse Facebook group. We’re a fun and supportive group. Really! There’s so much help there that chances are your question will be answered by someone before I even see it. It’s the best place to go with a question. It’s also a great place to share your Polly Plum makes and see what others are making.
If Facebook isn’t your thing you can also join the Ravelry group – Polly’s Place or follow @polly_plum_crochet on Instagram.
