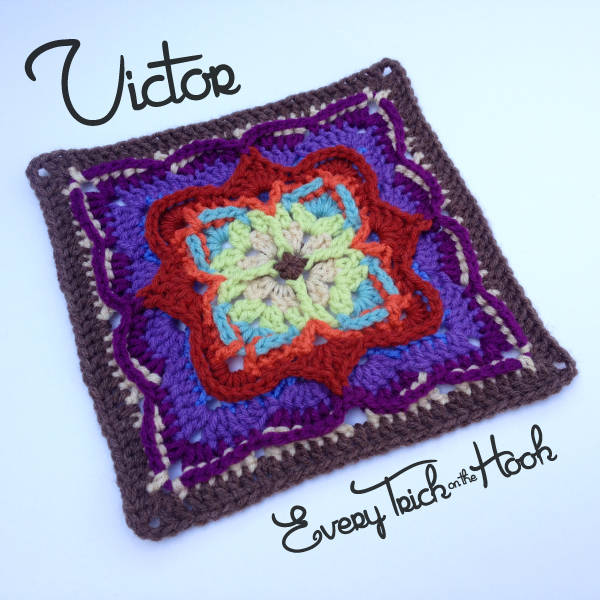
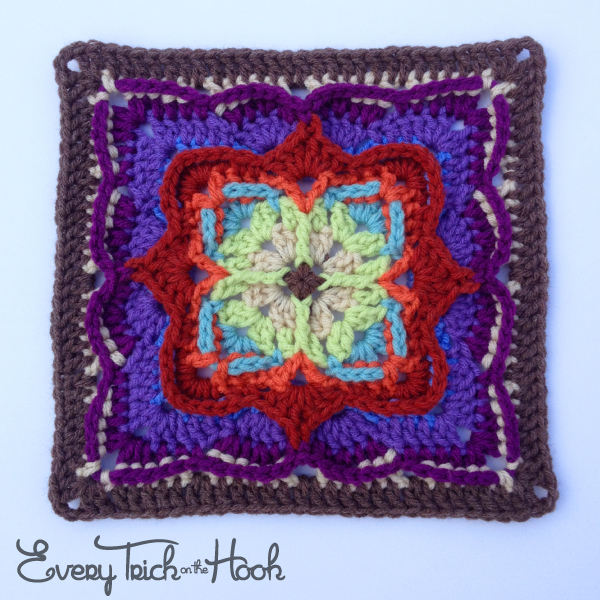
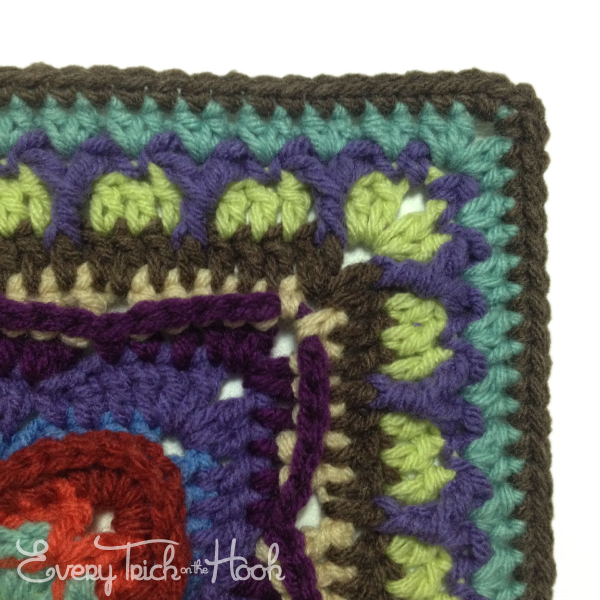
The Lovestruck Collection honors those happy couples that taught us about true love and how to find it. But let’s face it, not everyone ends up on the happy side of the love triangle. So to pay tribute to those lonelier souls I give you the Love-skunked Collection.
Victor is the first installment in the collection, and yes, technically he got the girl. But even if Ilsa left with Laszlo, she chose Rick, and the three of them are going to have to live with that for the rest of their lives. I just don’t think Victor is the winner here. Tell me what you think in the comments.
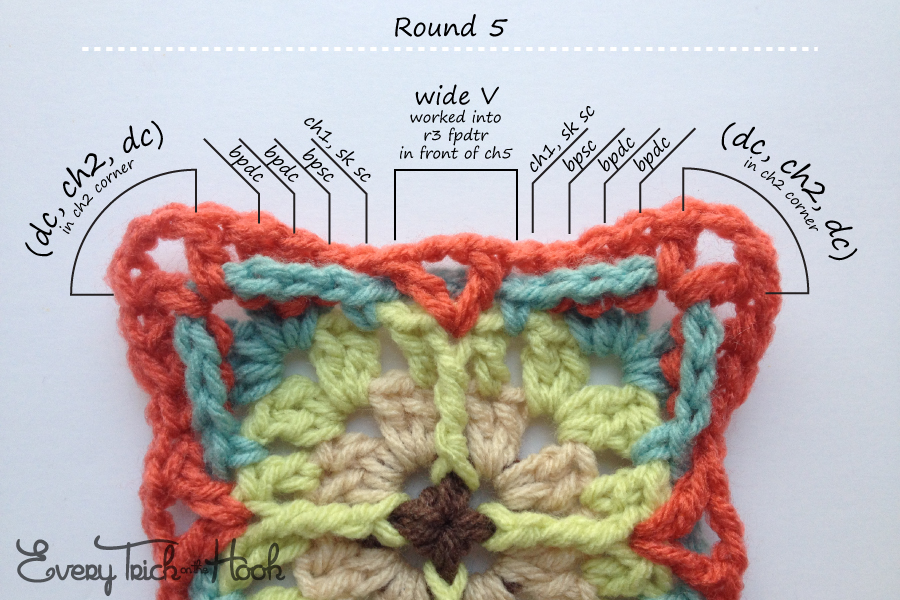
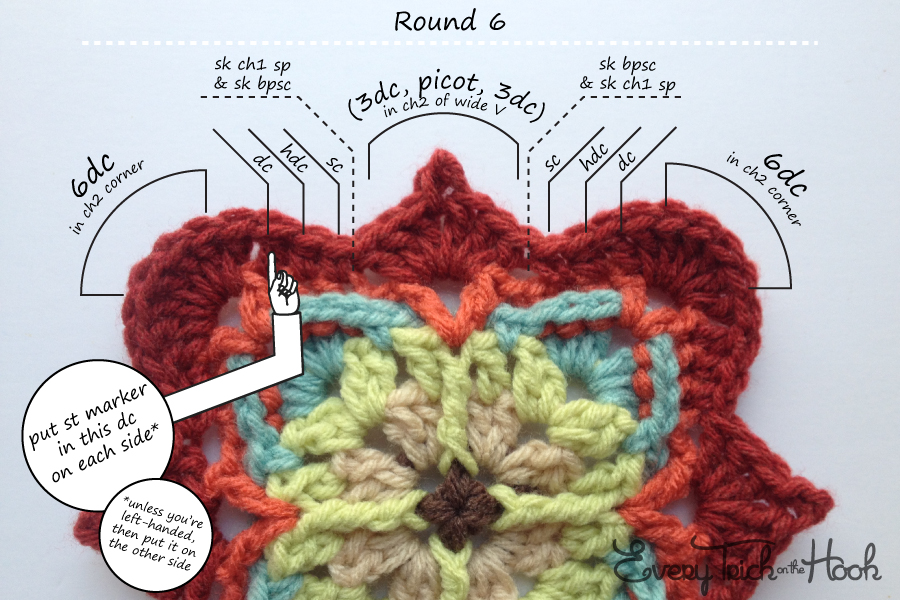
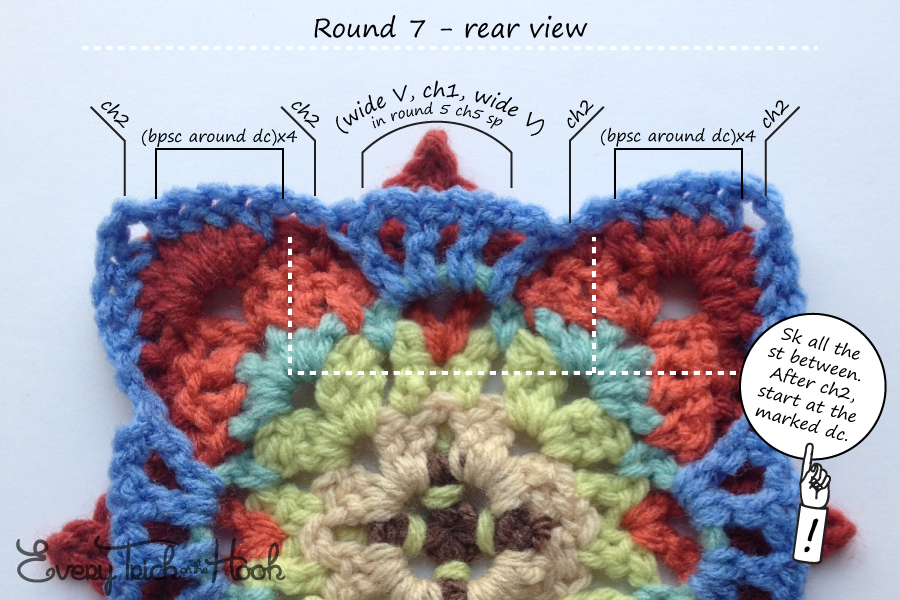
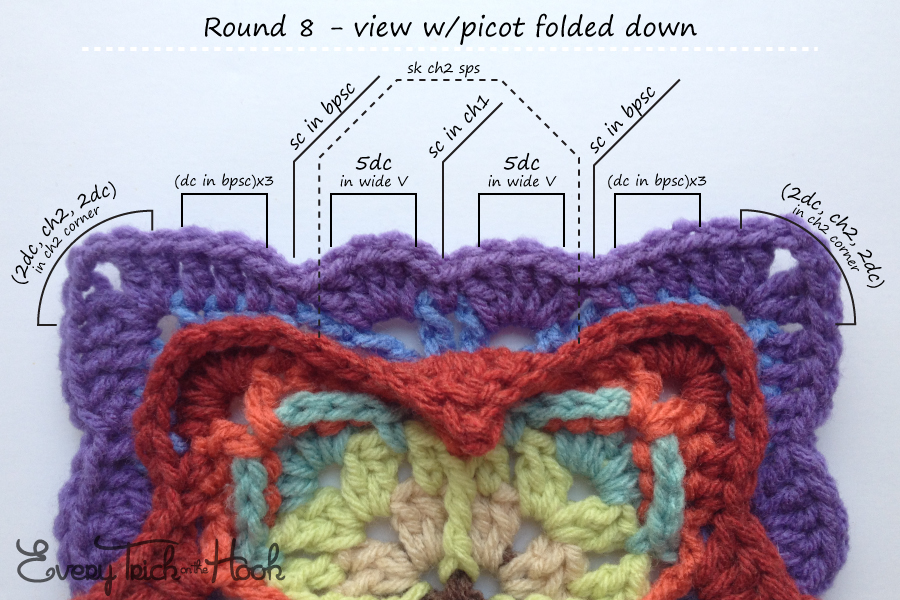
The pattern below includes round by round photo tutorials and quick-glance instructions. The quick-glance instructions are designed to compliment the pattern for beginners, providing a visual guide for stitch placement. However, the more advanced crocheter may find that they can use the photo tutorials to skip the pattern instructions completely, at least in some areas. They don’t contain instructions on starting or finishing the round, so you can check out the pattern if you need to know that stuff or other details. Please, let me know how these photo tutorials work for you and if you think I can improve them in any way. Their point is to make following a crochet pattern easier and more fun. So, if they could do a better job at either of those things, I definitely want to know.
The Love-skunked collection is a subset of the Lovestruck Collection – a collection of twelve unique afghan blocks with mix and match borders.
Victor
by Polly Plum
Crochet Terms: American
Skill Level: Advanced beginner
Finished Size: 9 or 12 inches
Gauge: About 3.25″ through round 3
Yarn: Worsted weight
Crochet Hook Size: I/5.5mm
Additional Materials: 4 stitch markers, yarn needle
Finished Stitch Count per Side: 30
Designer’s Notes
Click here to queue, favorite, or create a project page for Victor on Ravelry.
Printable color placement chart coming soon someday!
Click on any of the photo tutorial photos to enlarge them, which is especially useful for the later rounds that contain smaller text.
This pattern is free for personal use only. Please see my Copyright page for more details on what that means.
Abbreviations
ch – chain
dc – double crochet
hdc – half double crochet
r(#) – round number
sc – single crochet
sk – skip
slst – slip stitch
sp – space
st- stitch
tr – treble crochet
yo – yarn over
Special Stitches
bpsc, bphdc, bpdc – (back post) like normal sc/hdc/dc, but instead of inserting hook at the top of indicated stitch, insert it from back to front around the post of stitch
fpdc, fptr – (front post) like normal dc/tr, but instead of inserting hook at the top of indicated stitch, insert it from front to back around the post of stitch
fpdtr – yo three times, insert hook from front to back around post of st, yo and pull up a loop, (yo and pull through 2 loops on hook) 4 times
picot – ch3, slst into back bump of first ch
standing sc – to start a round, with slip knot on hook, insert hook into indicated stitch, yo and pull up a loop, yo and pull through two loops on hook
standing dc – to start a round, with slip knot on hook, hold slip knot in place with thumb or finger, yo and hold that in place too, insert hook in indicated stitch, yo and pull up a loop, carefully yo and draw yarn through two loops on hook twice
standing wide V – standing dc, ch2, dc
wide V stitch – dc, ch2, dc
Commence Pattern
Begin with a double magic circle. (Click here to see the tutorial.)
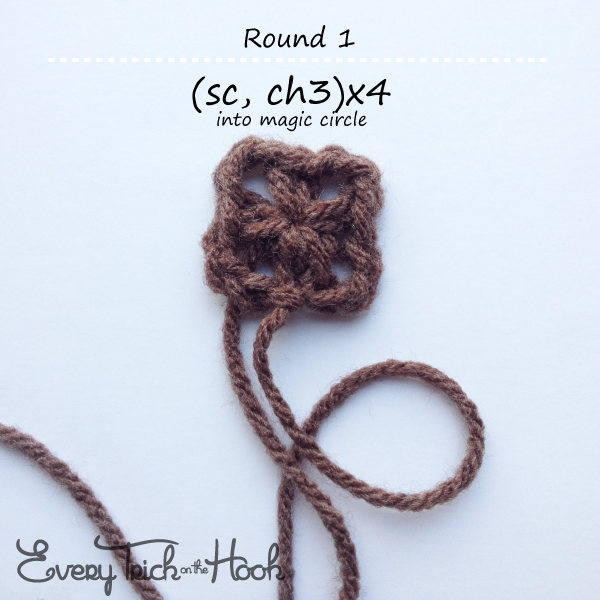
Round 1: Ch1. (Sc in magic circle, ch3) 4 times. Close magic circle. Slst to first sc to join.
4 sc, 4 ch3 sp
Round 2: Slst into next ch3 sp, ch3 (counts as first dc here and throughout) [Color change option: standing dc in any ch3 sp]. (Dc, ch2, 2dc) in same ch3 sp. *Ch1, sk next sc, (2dc, ch2, 2dc) in next ch3 sp.* Repeat from * to * 2 times. Ch1, sk last sc, and slst to first dc to join.
16 dc, 4 ch2 sp, 4 ch1 sp
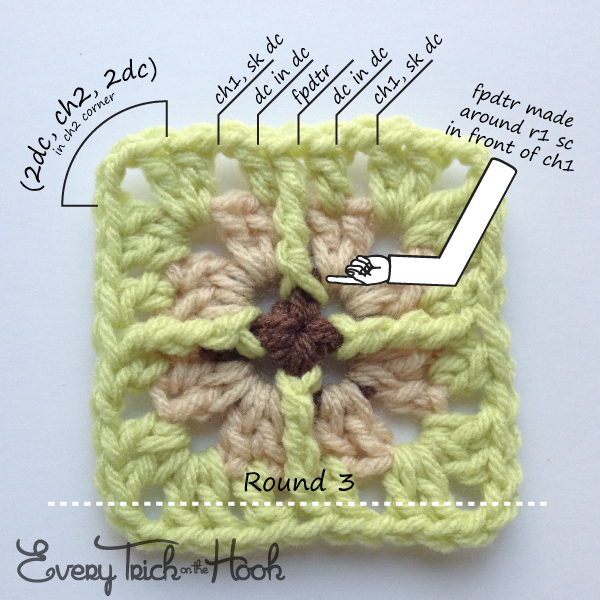
Round 3: Slst into next dc, slst into next ch2 sp, ch3 [Color change option: standing dc in any corner ch2 sp]. (Dc, ch2, 2dc) in same corner ch2 sp. *^Ch1, sk next dc, dc in next dc, sk next ch1 sp, fpdtr around sc from r1, dc in next dc, ch1, sk next dc,^ (2dc, ch2, 2dc) in corner ch2 sp.* Repeat from * to * twice and from ^ to ^ once more. Slst to first dc to join.
4fpdtr, 24 dc, 4 ch2 sp, 8 ch1 sp (9 st per side, not counting ch2 corners)
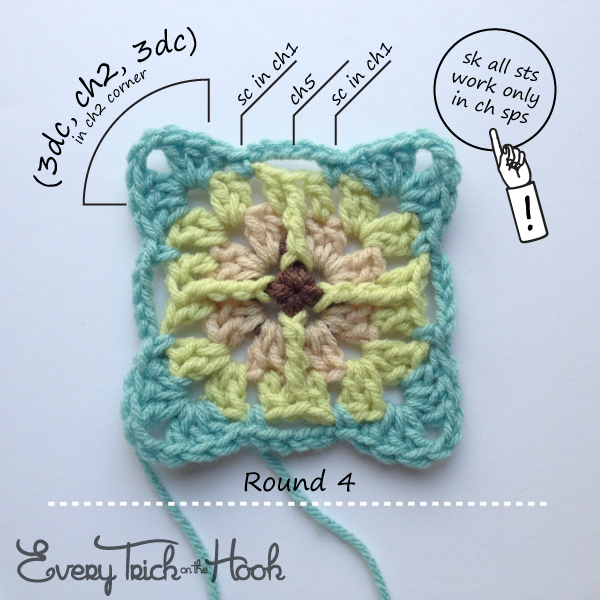
Round 4: Slst into next dc, slst into next ch2 sp, ch3 [Color change option: standing dc in any corner ch2 sp]. (2dc, ch2, 3dc) in same ch2 corner. *^Sk next 2 dc, sc in next ch1 sp, ch5, sk next 3 st, sc in next ch1 sp, sk next 2 dc,^ (3dc, ch2, 3dc) in corner ch2 sp.* Repeat from * to * twice and from ^ to ^ once more. Slst to first dc to join. Fasten off.
24 dc, 8 sc, 4 ch5 sp, 4 ch2 sp, (13 st per side, not counting ch2 corners)
Round 5: Standing wide V in any fpdtr from r3 keeping work in front of r4 ch5 sp. *^Ch1, sk the ch5 sp, sk the next sc, bpsc around next dc, bpdc around next 2 dc, (dc, ch2, dc) in corner ch2 sp, bpdc around next 2 dc, bpsc around next dc, ch1, sk next sc,^ wide V in fpdtr from r3 keeping work in front of ch5 sp.* Repeat from * to * twice and from ^ to ^ once more. Slst to first dc of first wide V to join.
4 wide V stitches, 8 dc, 16 bpdc, 8 bpsc, 4 ch2 sp, 8 ch1 sp (14 st per side, not counting ch2 corners)
Round 6: Slst into ch2 sp of wide V and ch3 [Color change option: Standing dc in ch2 sp of any wide V]. (2dc, picot, 3dc) in same ch2 sp. *^Sk next dc of wide V, sk ch1 sp, sk next bpsc, sc in next bpdc, hdc in next bpdc, dc in next dc (put a st marker in this dc to help you identify it in the next round), 6dc in corner ch2 sp, dc in next dc, hdc in next bpdc, sc in next bpdc, sk next bpsc, sk next ch1 sp, sk next dc of wide V,^ (3dc, picot, 3dc) in ch2 sp of wide V.* Repeat from * to * twice and from ^ to ^ once more. Slst to first dc to join. Fasten off.
56 dc, 8 hdc, 8 sc, 4 picot (19 st per side, no corners, picot counts as 1)
Round 7: Standing wide V in any ch5 sp from r4 keeping work behind r5 and r6. Ch1 and wide V in same ch5 sp. *^Ch2, sk all sts up to the marked dc, bpsc around marked dc, bpsc around next 3 dc, ch2 (corner), bpsc around next 4 dc, ch2,^ (wide V, ch1, wide V) in next ch5 sp from r4 keeping work behind r5 and r6.* Repeat from * to * twice and from ^ to ^ once more. Slst to first dc of first wide V to join.
8 wide V, 32 bpsc, 12 ch2 sp (21 st per side, not counting ch2 corners)
Round 8: Slst into ch2 sp of wide V and ch3 [Color change option: standing dc in first wide V of any side]. 4dc in same wide V. *^Sk next dc of wide V, sc in next ch1 sp, sk next dc of wide V, 5dc in ch2 sp of wide V, sk next dc of wide V, sk next ch2 sp, sc in next bpsc, dc in next 3 bpsc, (2dc, ch2, 2dc) in corner ch2 sp, dc in next 3 bpsc, sc in next bpsc, sk next ch2 sp, sk next dc of wide V,^ 5dc in ch2 sp of next wide V.* Repeat from * to * twice and from ^ to ^ once more. Slst to first dc to join.
80 dc, 12 sc, 4 ch2 sp (23 st per side, not counting ch2 corners)
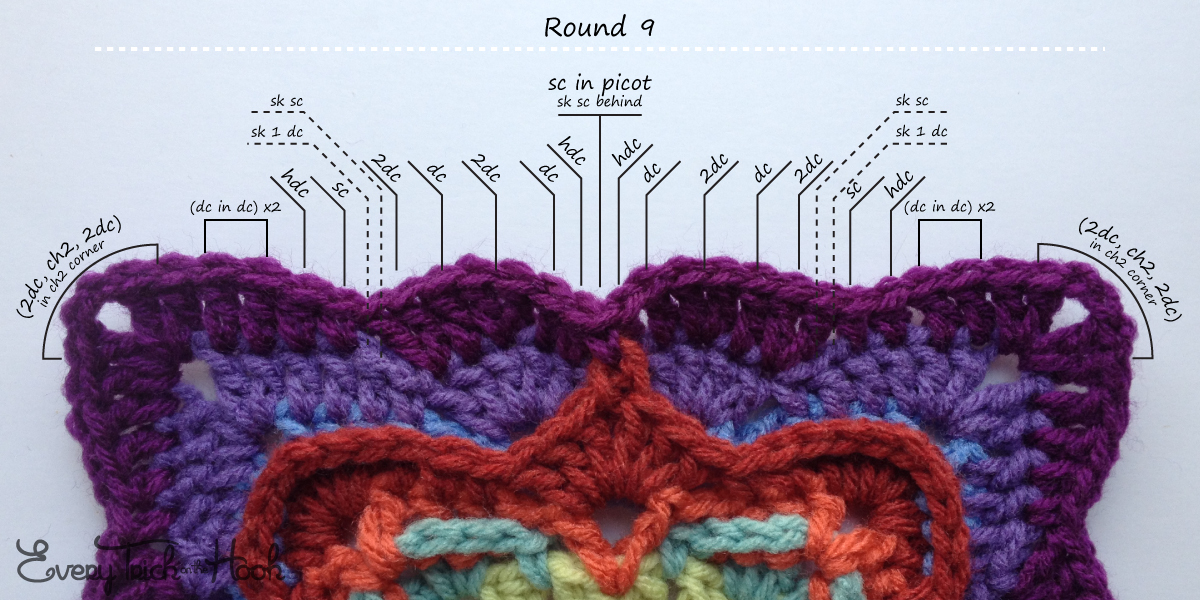
Round 9: Ch3 [Color change option: standing dc in joining st]. Dc again in same st as join. Dc in next dc, 2dc in next dc, dc in next dc. *^Hdc in next dc, sc in center of picot from r6, sk next sc (now hidden behind picot/sc), hdc in next dc, (dc in next dc, 2dc in next dc) twice, sk next 2 st, sc in next dc, hdc in next dc, dc in next 2 dc, (2dc, ch2, 2dc) in corner ch2 sp, dc in next 2 dc, hdc in next dc, sc in next dc, sk next 2 st,^ (2dc in next dc, dc in next dc) twice.* Repeat from * to * twice and from ^ to ^ once more. Slst to first dc to join. Fasten off.
80 dc, 16 hdc, 12 sc, 4 ch2 sp (27 st per side, not counting ch2 corners)
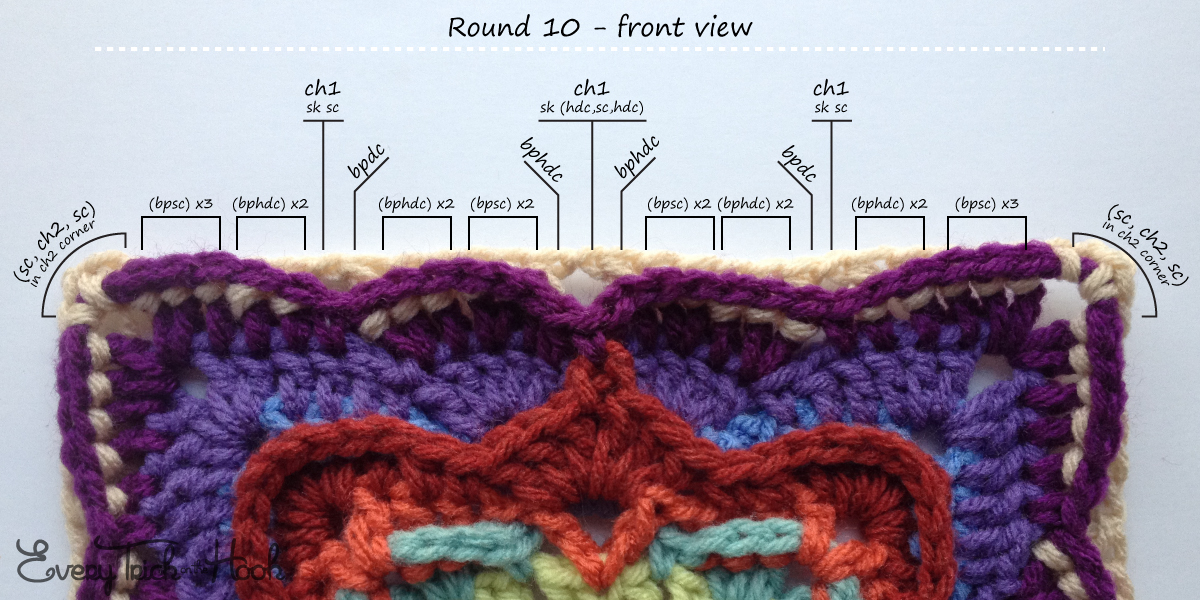
Round 10: Standing sc in any ch2 corner. (Ch2, sc) in same sp. *^Bpsc around next 3 dc, bphdc around next 2 st, ch1, sk next sc, bpdc around next dc, bphdc around next 2 dc, bpsc around next 2 dc, bphdc around next dc, ch1, sk next 3 st, bphdc around next dc, bpsc around next 2 dc, bphdc around next 2dc, bpdc around next dc, ch1, sk next sc, bphdc around next 2 st, bpsc around next 3 dc,^ (sc, ch2, sc) in corner ch2 sp.* Repeat from * to * twice and from ^ to ^ once more. Slst to first sc to join.
8 bpdc, 40 bphdc, 40 bpsc, 8 sc, 4 ch2 sp, 12 ch1 sp (27 st per side, not counting ch2 corners)
You may have more success looking at this diagram from the back. Click here for that diagram.
Note: This note is only for those who are going on to the rounds for a 12 inch square AND are sticklers for symmetry or perfectionists. You see, all of the Lovestruck squares end with 30 stitches per side, as does Victor. All of the Lovestruck squares with their borders end with 40 stitches per side, as will Victor. But, I’ll be honest here, Victor’s border will work better with 31 stitches per side. If you don’t care, then just don’t worry about it and follow the instructions as written. I promise no one will ever notice the ever so slight adjustment I’ve made to compensate. If you do care, and you’re worried you’ll be up at night thinking about how that one stitch is cocked ever so slightly, please first accept my apology for not changing the pattern and adhering to my already in place standards for stitch counts. Second, and this is the only part of this note that actually matters, don’t skip the first stitch of each side in round 11 and you’ll get a stitch count of 31 per side. Then, when you get to the crucial moment in the border, I’ll let you know what to do. Just look for another couple notes in italics before rounds 12 and 13.
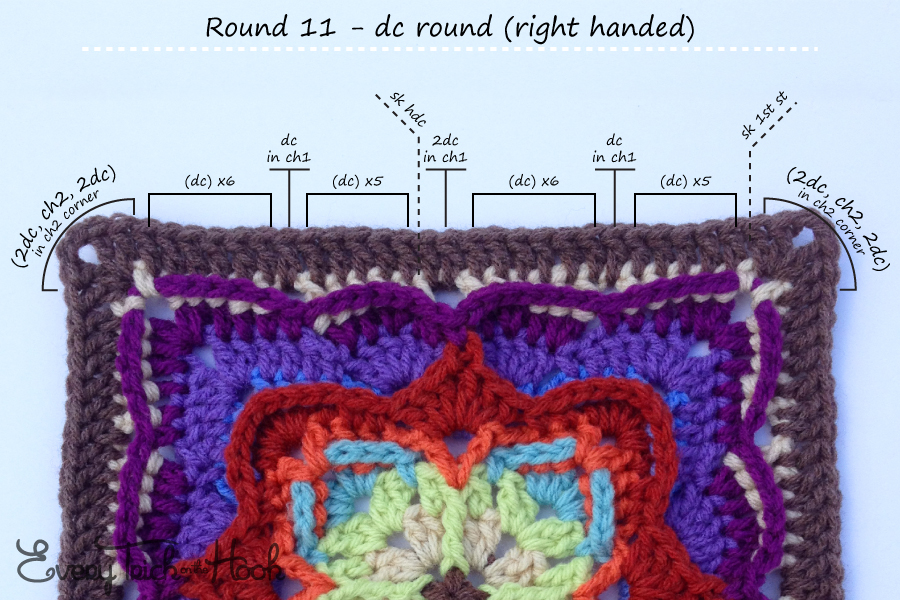
Round 11: Ch3 [Color change option: standing dc in any sc immediately before any ch2 corner]. *(2dc, ch2, 2dc) in corner ch2 sp, sk next st, dc in next 5 st, dc in ch1 sp, dc in next 6 st, 2dc in next ch1 sp, sk next st, dc in next 5 st, dc in next ch1 sp, dc in next 6 st.* Repeat from * to * 3 times omitting last 1dc on final repeat. Slst to first dc to join. Fasten off.
120 dc, 4 ch2 sp (30 st per side, not counting ch2 corners)
Click here for a left-handed version of the round 11 diagram.
Weave in all ends and block, or continue to the additional rounds for the 12 inch version below.
Victor Border – aka 12 inch version
The following instructions are for the optional border to make Victor, or any other Lovestruck square into a 12 inch square. These instructions can also be used on any square or rectangular project with a base stitch count per side of 4x + 2, with ch2 spaces for corners, though the base round must be a solid round of stitches with no chain spaces so as to accommodate the post stitches.
Note: If you had the patience to read my rambling note pre-round 11, and you decided to heed my warning and made your round 11 end with 31 stitches, here’s what will be different in round 12: you’ll skip 2 stitches at the end of each side, just before the corner ch2 sp, instead of one.
Round 12: (Standing dc, dc, ch2, 2dc) in any corner ch2 sp. *^Ch1, sk next 2 st, (dc in next 3 st, ch1, sk next st) repeat across to corner ch2 sp,^ (2dc, ch2, 2dc) in corner ch2 sp.* Repeat from * to * twice and from ^ to ^ once more. Slst to first dc to join.
100 dc, 4 ch2 sp, 32 ch1 sp (33 st per side, not counting ch2 corners)
Note: Here’s the grand finale of operation ‘Slightly wonky stitch’. In this round your first and last fptr of each side will go in the second and second to last stitches of round 11, respectively.
Round 13: Slst into next dc, ch1 and sc in same st [Color change option: standing sc in the last dc of any round {the dc immediately before the ch2 corner}]. *(Sc, ch2, sc) in corner ch2 sp, sc in next st, fptr around first st of side from r11, sk next r12 st {now hidden behind fptr}, sc in ch1 sp, fpdc around the fptr just made, sk next st {now hidden behind fpdc}, sc in the next dc {the center dc of the group of 3}, (fptr around skipped st from r11 {the one directly below the next ch1 sp}, sk next dc {now hidden behind fptr}, sc in ch1 sp, fpdc around the fptr just made, sk next dc {now hidden behind fpdc}, sc in the next dc) repeat across to corner.* Repeat from * to * three times omitting last sc on final repeat. Slst to first sc to join.
32 fptr, 32 fpdc, 76 sc (35 st per side, not counting ch2 corners)
Round 14: Ch2 {counts as first hdc} [Color change option: standing hdc in second to last st of any side]. Hdc again in same st. Sk next st. *(2Hdc, ch2, 2hdc) in corner ch2 sp, sk next st, (2hdc in next sc, sk next st) repeat across to corner.* Repeat from * to * three times omitting last 2 hdc on final repeat. Slst to first hdc to join.
152 hdc, 4 ch2 corners (38 st per side, not counting ch2 corners)
Round 15: Ch1 and sc in same st [Color change option: standing sc in fourth to last st of any side]. *Sc in each st across to corner, (sc, ch2, sc) in corner ch2 sp.* Repeat from * to * three times. Sc in each remaining st to first st. Slst to first sc to join. Fasten off.
160 sc, 4 ch2 corners (40 st per side, not counting ch2 corners)
Now, weave in any ends you didn’t weave as you went and get that baby on your blocking station.
