Welcome back for week 18 of the Friends Around the World CAL. Make sure you click the link and visit the blog to get all the info on the CAL if you aren’t already participating. There are tons of brand new and free squares that I know you’ll love.
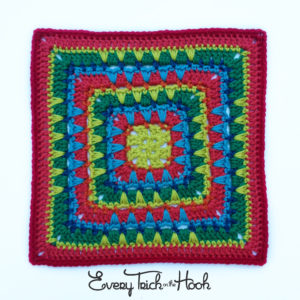
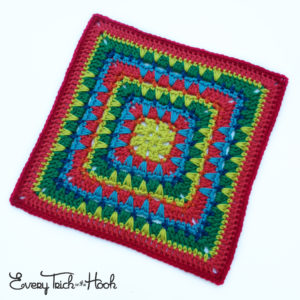
This week’s square is something a little different for me – it’s a pretty straightforward design. It’s so straightforward, in fact, that you can actually make any sized square you like. Once you’ve made the 12 inch version you’ll have a feel for the pattern repeat (which, unfortunately, isn’t quite straightforward enough that I can simply tell you to repeat rounds, it will take a small amount of figuring to make the square bigger than 12 inches, but I have no doubt you’ll see what I mean in no time). All you need to do to get a different sized square is stop crocheting at any point (though, my preference is to stop at a spike stitch round) and add a round or two of sc, hdc, or dc to even out the edges and size up your square.
As usual I’ve made my sample with tons of color so that you can see the difference in each round. But I think you’ll love the look in one color. It will have a light texture with just a hint of openness. Or, in two or more colors you can bring out the toothy quality of the spike stitches. Have fun!
Spiked Punch
by Polly Plum
Crochet Terms: American
Skill Level: Easy
Finished Size: 12 inches
Gauge: About 3.75″ through round 4
Yarn: Worsted weight
Crochet Hook Size: I/5.5mm
Finished Stitch Count per Side: 39 plus ch2 corners
Click here to queue, favorite, or create a project page for Spiked Punch on Ravelry.
Click here to download a printer-friendly, text-mostly version of the pattern.
Click here to download the complementary color placement planning sheet.
This pattern is free for personal use only. Please see my Copyright page for more details on what that means.
Designer’s Notes
The pattern below includes round by round photo tutorials and quick-glance instructions. The quick-glance instructions are designed to complement the pattern for beginners, providing a visual guide for stitch placement. However, the more advanced crocheter may find that they can use the photo tutorials to skip the pattern instructions almost completely, at least in some areas. They don’t contain instructions on starting or finishing the round, so you can check out the pattern if you need to know that stuff or other details. Click on any of the photo tutorial diagrams to enlarge them.
Each round begins as through you are continuing with the same yarn from the last round. If you are changing colors, optional instructions for that are contained in [brackets].
Translations
I think this is the coolest part of the whole shebang. The pattern has been translated into NINE additional languages! PDFs can be downloaded by clicking the links below.
French – Coming soon!
Abbreviations
- ch – chain
- dc – double crochet
- hdc – half double crochet
- r(#) – round number
- sc – single crochet
- sk – skip
- slst – slip stitch
- sp – space
- st– stitch
- tr – treble crochet
- yo – yarn over
Special Stitches
- Spike Stitch – insert your hook into indicated st or sp and pull up a loop, pull that loop up to the height of your work, yo and pull through both loops on hook (Note: A spike stitch should not pull your work down so make sure you pull the loop up tall enough that there is no buckling.)
- Standing sc – to start a round, with slip knot on hook, insert hook into indicated stitch, yo and pull up a loop, yo and pull through two loops on hook (Note: if you’re not comfortable doing standing stitches, as an alternative you can slst into the indicated st, ch1 and sc in same st)
- Standing dc – to start a round, with slip knot on hook, hold slip knot in place with thumb or finger, yo and hold that in place too, insert hook in indicated stitch, yo and pull up a loop, carefully yo and draw yarn through two loops on hook twice (Note: if you’re not comfortable doing standing stitches, as an alternative you can slst into the indicated st and ch3 to count as your first dc)
Commence Pattern
Begin with a magic circle/double magic circle. (See my tutorial for double magic circles, including a video, here!)
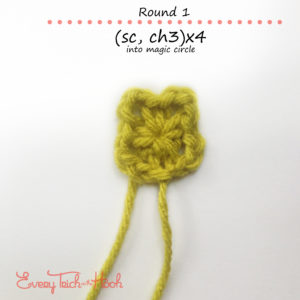
Round 1: Ch1 to secure magic circle. (Sc into magic circle, ch3) 4 times. Close magic circle and slst to first sc to join. Do not fasten off.
4 sc, 4 ch3 sp
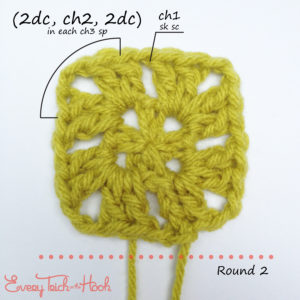
Round 2: Slst into next ch3 sp, ch3 (counts as first dc here and throughout), (dc, ch2, 2dc) into same ch3 sp. [Ch1, sk next sc, (2dc, ch2, 2dc) into next ch3 sp] 3 times. Ch1 and slst to first dc to join.
5 st per side / 16 dc, 4 ch1 sp, 4 ch2 corners
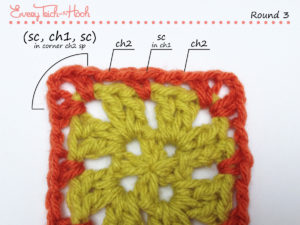
Round 3: Slst into next dc and slst into next ch2 sp, ch1 and sc in same ch2 sp [Color change option: standing sc in any ch2 sp]. Ch2 and sc in same ch2 sp. *^Ch2, sk next 2 dc, sc in next ch1 sp, ch2, sk next 2 dc,^ (sc, ch2, sc) in next ch2 sp.* Repeat from * to * twice and from ^ to ^ once more. Slst to first sc to join.
7 st per side (counting all chs except ch2 corners) / 12 sc, 12 ch2 sp (2 per side plus 4 corners),
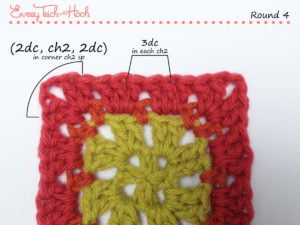
Round 4: Slst into next ch2 sp, ch3 [Color change option: Standing dc in any corner ch2 sp]. (Dc, ch2, 2dc) in same ch2 sp. *^[Sk next sc, 3dc in next ch2 sp] twice, sk next sc,^ (2dc, ch2, 2dc) in corner ch2 sp.* Repeat from * to * twice and from ^ to ^ once more. Slst to first dc to join.
10 st per side / 40 dc, 4 ch2 corners
Time to check your gauge! At this point your square should measure about 3.75 inches from side-to-side if you are using the suggested worsted weight yarn and 5.5mm hook. Measure your square, and if it’s close to 3.75 inches your final product should be very close to or exactly 12 inches. If not, you may want to adjust your hook size accordingly and start over.
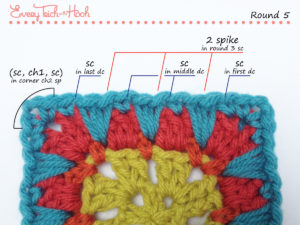
Note: The spike stitches can throw you off a bit because they sort of float above the stitches of the last round, so to help, take note that the scs of this round will fall in the first dc, the middle dc of each of the 3dc groups, and the last dc of each side.
Round 5: Slst into next dc, ch1 and sc in same st (should be last dc of side) [Color change option: standing sc in last dc of any side]. *(Sc, ch2, sc) in corner ch2 sp, sc in next dc, [work 2 spike stitches into skipped sc from r3 directly below, sk the 2 dc that these spike stitches cover, sc in next dc] 3 times.* Repeat from * to * 3 times omitting the last sc on the last repeat. Slst to first sc to join.
12 st per side / 24 spike st (6 per side), 24 sc (6 per side), 4 ch2 corners
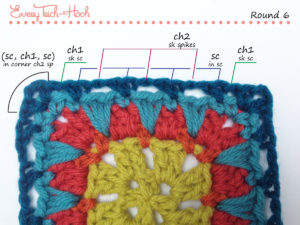
Round 6: Ch1 and sc in same st as join [Color change option: Standing sc in joining st]. *^Ch1, sk next sc, (sc, ch2, sc) in corner ch2 sp, ch1, sk next sc, [sc in next sc, ch2, sk next 2 spike st] 3 times,^ sc in next sc.* Repeat from * to * twice and from ^ to ^ once more. Slst to first sc to join.
14 st per side (counting chs) / 24 sc (6 per side), 16 ch2 sp (3 per side plus 4 corners), 8 ch1 sp (2 per side)
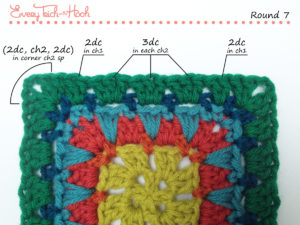
Round 7: Slst into next ch1 sp and ch3 [Color change option: Standing dc in ch1 sp after join]. Dc in same ch1 sp. *^Sk next sc, (2dc, ch2, 2dc) in corner ch2 sp, sk next sc, 2dc in next ch1 sp, [sk next sc, 3dc in next ch2 sp] 3 times, sk next sc,^ 2dc in next ch1 sp.* Repeat from * to * twice and from ^ to ^ once more. Slst to first dc to join.
17 st per side / 68 dc (17 per side), 4 ch2 corners
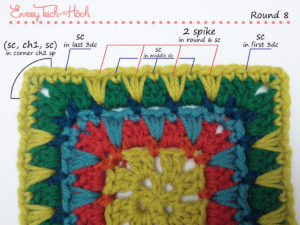
Round 8: Slst into next dc, ch1 and sc in same st [Color change option: Standing sc in the dc immediately after the joining st, this will be the 3rd dc from the end of the side]. *Sc in next 2 dc, (sc, ch2, sc) in corner ch2 sp, sc in next 3 dc, [work 2 spike stitches into skipped sc from r6 directly below, sk the 2 dc that these spike stitches cover, sc in next dc] 4 times.* Repeat from * to * 3 times omitting the last sc on the last repeat. Slst to first sc to join.
19 st per side / 32 spike st (8 per side), 44 sc (11 per side), 4 ch2 corners
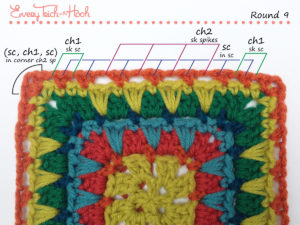
Round 9: Ch1 and sc in same st as join [Color change option: Standing sc in joining st]. *Ch1, sk next sc, sc in next sc, ch1, sk next sc, (sc, ch2, sc) in corner ch2 sp, [ch1, sk next sc, sc in next sc] twice, [ch2, sk next 2 spike st, sc in next sc] 4 times.* Repeat from * to * 3 times omitting the last sc on the last repeat. Slst to first sc to join.
21 st per side (counting chs) \ 36 sc (9 per side), 20 ch2 sp (4 per side plus corners), 16 ch1 sp (4 per side)
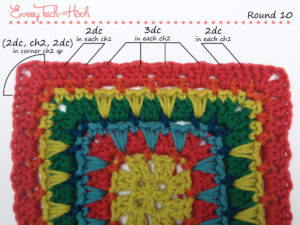
Round 10: Slst into next ch1 sp and ch3 [Color change option: Standing dc in ch1 sp after join]. Dc in same ch1 sp. Sk next sc, 2dc in next ch1 sp. *^Sk next sc, (2dc, ch2, 2dc) in next corner ch2 sp, [sk next sc, 2dc in next ch1 sp] twice, [sk next sc, 3dc in next ch2 sp] 4 times,^ [sk next sc, 2dc in next ch1 sp] twice.* Repeat from * to * twice and from ^ to ^ once more. Slst to first dc to join.
24 st per side / 96 dc (24 per side), 4 ch2 corners
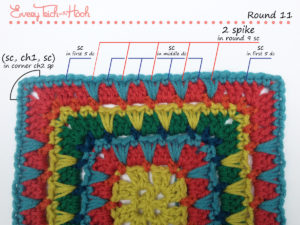
Round 11: Slst into next dc, ch1 and sc in same st [Color change option: Standing sc in the dc immediately after the joining st, this will be the 5th dc from the end of the side]. *Sc in next 4 dc, (sc, ch2, sc) in corner ch2 sp, sc in next 5 dc, [work 2 spike stitches into skipped sc from r9 directly below, sk the 2 dc that these spike stitches cover, sc in next dc] 5 times.* Repeat from * to * 3 times omitting the last sc on the last repeat. Slst to first sc to join.
26 st per side / 40 spike st (10 per side), 64 sc (16 per side), 4 ch2 corners
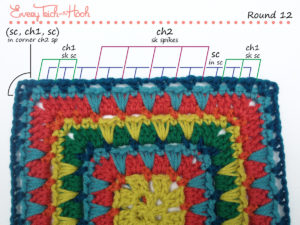
Round 12: Ch1 and sc in same st as join [Color change option: Standing sc in joining st]. *[Ch1, sk next sc, sc in next sc] twice, ch1, sk next sc, (sc, ch2, sc) in corner ch2 sp, [ch1, sk next sc, sc in next sc] 3 times, [ch2, sk next 2 spike st, sc in next sc] 5 times.* Repeat from * to * 3 times omitting the last sc on the last repeat. Slst to first sc to join.
28 st per side (counting chs) / 48 sc (12 per side), 24 ch2 sp (5 per side plus corners), 24 ch1 sp (6 per side)
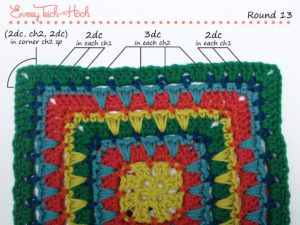
Round 13: Slst into next ch1 sp and ch3 [Color change option: Standing dc in ch1 sp after join]. Dc in same ch1 sp. [Sk next sc, 2dc in next ch1 sp] twice. *^Sk next sc, (2dc, ch2, 2dc) in next corner ch2 sp, [sk next sc, 2dc in next ch1 sp] 3 times, [sk next sc, 3dc in next ch2 sp] 5 times,^ [sk next sc, 2dc in next ch1 sp] 3 times.* Repeat from * to * twice and from ^ to ^ once more. Slst to first dc to join.
31 st per side / 124 dc (31 per side), 4 ch2 corners
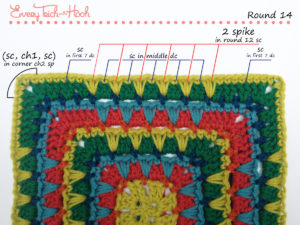
Round 14: Slst into next dc, ch1 and sc in same st [Color change option: Standing sc in the dc immediately after the joining st, this will be the 7th dc from the end of the side]. *Sc in next 6 dc, (sc, ch2, sc) in corner ch2 sp, sc in next 7 dc, [work 2 spike stitches into skipped sc from r12 directly below, sk the 2 dc that these spike stitches cover, sc in next dc] 6 times.* Repeat from * to * 3 times omitting the last sc on the last repeat. Slst to first sc to join.
33 st per side / 48 spike st (12 per side), 84 sc (21 per side), 4 ch2 corners
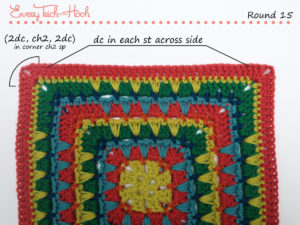
Round 15: Ch3 [Color change option: Standing dc in joining st]. Dc in next 7 sc. *(2dc, ch2, 2dc) in corner ch2 sp, dc in each sc and spike st across to next corner.* Repeat from * to * 3 times, working last repeat until first dc. Slst to first dc to join.
37 st per side / 148 dc (37 per side), 4 ch2 corners
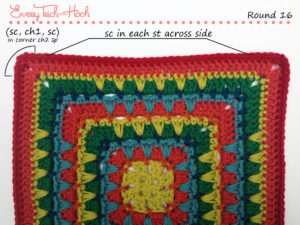
Round 16: Ch1 and sc in same st as join [Color change option: Standing sc in joining st]. Sc in next 9 dc. *(Sc, ch2, sc) in corner ch2 sp, sc in each dc across to next corner.* Repeat from * to * 3 times, working last repeat until first sc. Slst to first sc to join.
39 st per side / 156 sc (39 per side), 4 ch2 corners
Fasten off and weave in all ends.
Well that’s it for my part of this CAL. I hope you enjoyed this square and last week’s square (Marigold).
If you have any questions, the best place to find me is on my Facebook page, Every Trick on the Hook, or on Ravelry, my user name is pollyplum (add me to your friends list!). You can see all of my available patterns on the patterns page of everytrickonthehook.com, or in my Ravelry store.
Crochet on, crochet strong!


I love this pattern!! Going to have so much fun working this.
I just wanted to point out, for all the rows with an sc, ch2, sc corner – the image says sc, ch1, sc instead of ch2. Likely anyone working from the figures would catch and correct that while working, but it might be confusing for some people.