The advanced techniques I’ve used in A Day at the Grand Bazaar are fairly common these days. If you’re already familiar with them, great! If you’re not, have a look below and remember: you do NOT have to use any of these. I’ve listed more traditional alternatives for each technique that are perfectly acceptable to use if you’re more comfortable with them. These techniques are simply things that can give your work a little extra polish.
Magic Circles
I always always always begin with a double magic circle.
You can check out my super detailed photo tutorial here on my blog. Or, watch the video below.
Disclaimer: this was one of the first videos I ever made and I was just getting my voice back after a cold.
Alternatives: I don’t ever recommend doing a regular magic circle, only double, but if you’re comfortable with how you make them and their security, then go for it. If you want to avoid magic circles all together, stick with a ch4 and slst to first chain to form a loop. Make your stitches into the chain loop, then check out the second part of the video to see how I use the tail to pull the chain loop closed and get rid of the tiny hole it leaves that a magic circle doesn’t.
Standing Stitches
Check out this little number on how to make standing stitches:
I adore standing stitches. So much that I make every first stitch a standing stitch if I can figure out how, and honestly, most of the time it’s perfectly possible. Post stitches, clusters, puffs, popcorns, trebles, double trebles, whatever; they all can be made as standing stitches. Once you understand the basics in the video, dare yourself to try some other stitch as a standing stitch. If you like it, when you get the the A stitch in the extensions of Grand Bazaar, challenge yourself to make them as standing stitches. It’s fun! I swear!
Alternatives: Don’t worry! Not everybody jumps on the standing stitch band wagon. If you’re not into it, keep doing what you’re doing. Use a slip stitch to join your yarn and the appropriate number of chains to act as the first stitch. Usually, that means you chain 1 and sc for the first sc and ignore the ch1; ch2 for an hdc; ch3 for a dc; and ch4 for a tr. If your first stitch is a post stitch, simply slip stitch around the post and continue with your starting chains.
Invisible Join
If you want to improve the presentation of your work dramatically, this is the thing to do. I’ve made a couple videos for this technique (and will probably make more in the future) because there are some pitfalls – like how to weave your ends when you invisible join to a standing stitch.
In the Grand Bazaar pattern you’ll notice I don’t instruct you to invisible join every time you change color. This is because, well, sometimes it’s not that big of a deal. I still prefer slip stitching to the first stitch for speed, so I only use an invisible join when I know it’s going to show. Therefore, I’ve only instructed you to use invisible join in the pattern when it’s really worth it. Of course, you’re welcome to invisible join all the rounds you see fit, or none of them. But if you’re like me, the pattern tells you when it’s a join that going to be seen in the final product by instructing you to invisible join.
Alternatives: slip stitch to the first stitch to join is perfect acceptable anywhere in the pattern.
Third Loop
I love the third loop and I completely overuse it. There, I said it.
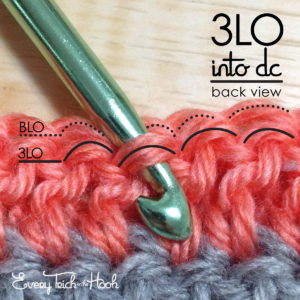
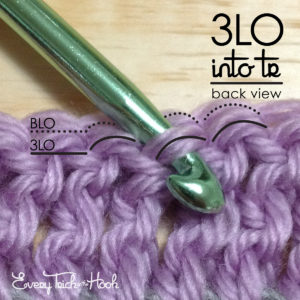
What’s the third loop you say? It’s the loop of yarn that can be found just behind/below the back loop. Most of the time it runs almost perfectly parallel to the back loop, but sometimes it can be slightly slanted. It exists on all stitches, though it’s not easy to work into on all stitches. It’s most practical on hdc with dc and tr tied for a close second.
Why work into the third loop? This magic little loop is fabulous when you want a nice crisp line of stitches where two colors of yarn do not mingle. There are other nifty uses (see my blog post linked below), but for the purposes of this project, that is it. The clean line is super shiny and makes for some good looking stitching.
I did a whole blog post about the third loop a while back. Have a look at it and at the pictures on finding the third loop below.

Working into third loop of a dc

Working into third loop of a tr
Alternatives: the problem with the third loop is that it can really be a pain to work into, and if you don’t like working into it, well, it might drive you batty. Your best bet is to work into the back loop only instead. I’m going to throw a wrench in that plan – if you want to work into the back loop only, try working into the back loop AND the third loop for a sturdier stitch. If you still hate doing that, just work into the back loop only. Regular stitches into both loops will work fine too but will greatly compromise the crispness of your line between colors.
That’s it for this edition of “Before We Begin.” Next up we’ll look at the special stitches section of A Day at the Grand Bazaar.
See you then,


Leave a Reply