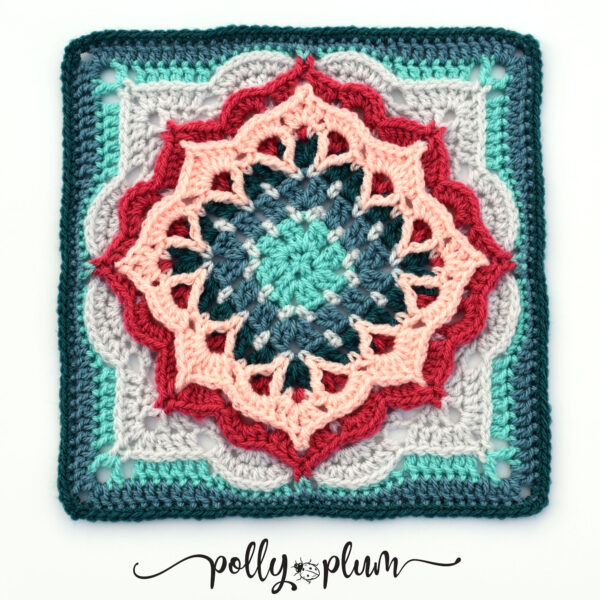
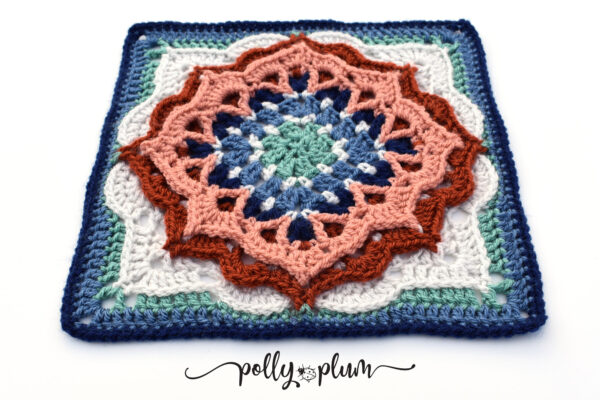
A brand new free afghan block / granny square pattern from Polly Plum. This fancy layered granny square crochet pattern is sure to be a stunning addition to your afghan block sampler blanket. And, it’s as interesting to make as it is to look at!
This page contains affiliate links. If you click them and make a purchase I get a small commission at no additional cost to you.
Happy New Year!!!
This is my 4th year of opening the Block a Month Crochet Along held in the Ravelry Forums. If you’ve been following me for some time then you know this is one of my favorite events to participate in. I found the group years ago, back when I was still a baby designer. Maybe even before that, I can’t remember!
Anyway, it’s a great event where you get a brand new FREE granny square pattern to crochet every month, plus members vote on an old favorite as a second square for the month. All you need is a Ravelry account (which is free) and to join the forum group linked above. It’s also a great group to go to if you need help with this pattern. The admins are super helpful and quick to answer.
You can also follow along on Instagram! @catkitbob_crochet posts the squares there too and you can use the hashtag #bamcal2023 when you make your own posts.
Another great place to get help is the Polly Plum Pattern Posse on Facebook where you’ll find all the crocheters who tested this pattern and many other loyal Polly Plum fans who are happy and able to help.
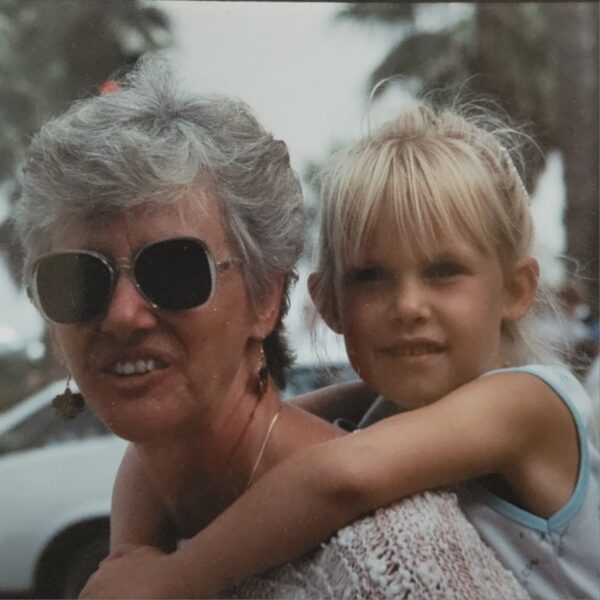
This design is dedicated to my Mom who took her last breath just a couple weeks ago. She taught me so much. And, she taught me to crochet. A little thing to pass the time that neither of us knew would turn into a life-long passion and a career.
Thanks, Mom. I’m really really going to miss you.
Now, on to the pattern…
Pattern PDF
First off, and importantly:
The pattern is totally FREE right here on this very webpage and will always be free right here.
But you can also buy the premium PDF version of the pattern and get a beautifully designed, printable, ad free pattern to add to your pattern binder all while supporting a small business.
So, why buy the PDF? The 10 page pattern PDF includes lots of extras and bonuses I know you’ll love, including:
- It’s printable
- It’s ad free
- It’s pretty! I put a lot of work into my graphic design so that you’ll enjoy looking at the printed pattern just as much as you enjoy making it and looking at what you’ve made
- There are lots of photos and tips to make the pattern as simple to follow as possible
- A color planning diagram – basically a coloring sheet for your square to help you plan and/or visualize what it will look like in your chosen colors
- My own tips on color placement
- It comes in both US and UK terminology
- You get to support a small business! And isn’t it nice to know you’re contributing to a family paying for real everyday expenses like buying diapers for their relentless poop machines… uh, I mean darling children, instead of a billionaire’s third yacht?
Click here to buy the pattern now on Ravelry!
Or, click here to get it on Etsy!
If you don’t feel like purchasing anything today, that’s ok! The written pattern contains everything you need to make this exact square. It’s even tested just as it’s presented below to be sure that it’s clear and easy to make even without all the extras.
Details
Pattern written in US crochet terms
Skill Level: intermediate
Finished Size: 10-inches in DK; 12-inches in Aran
Hook Size: 4mm for DK; 5mm for Aran
Yarn: Samples made in Stylecraft Special DK
Final Stitch Count: 39 sts per side
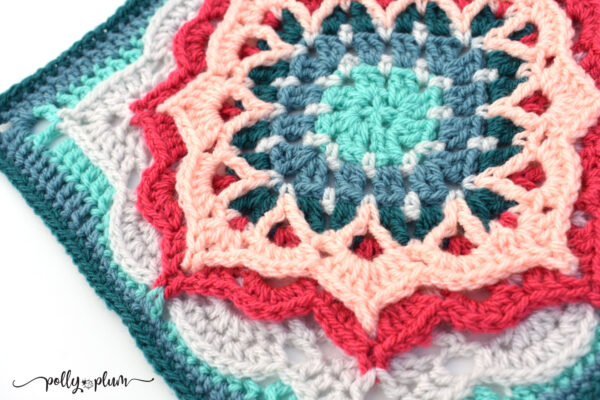
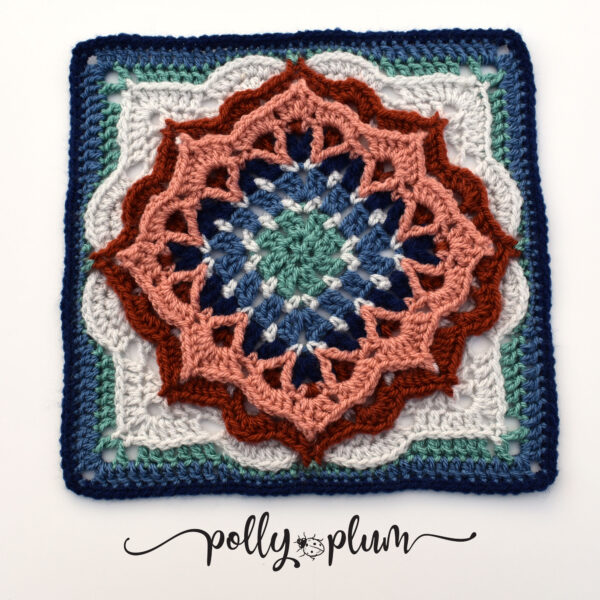
Color Planning
This pattern is written with color creativity in mind. Every round (where possible) includes the option to start with a new color or continue with the same color from the last round.
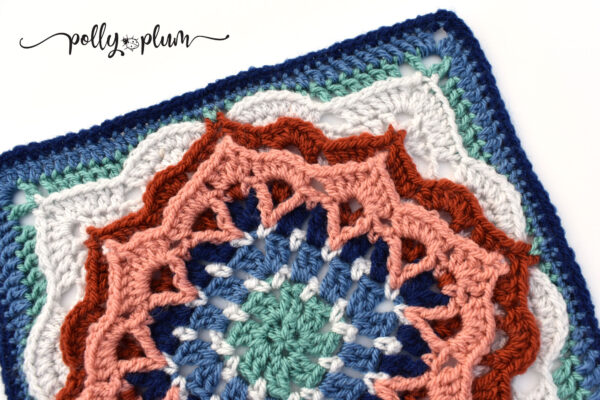
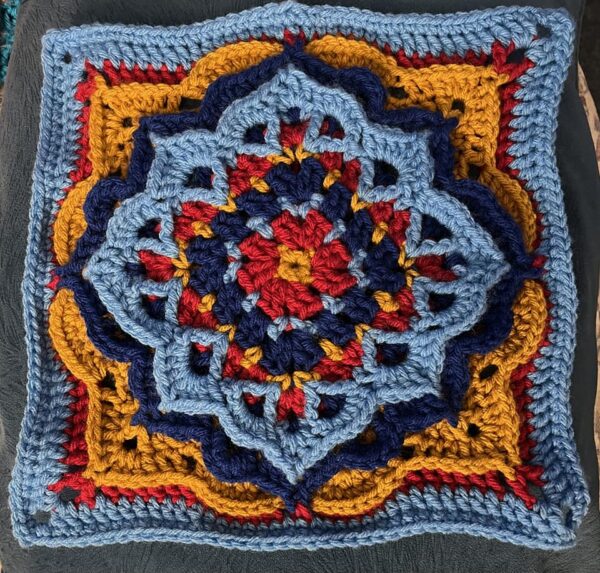
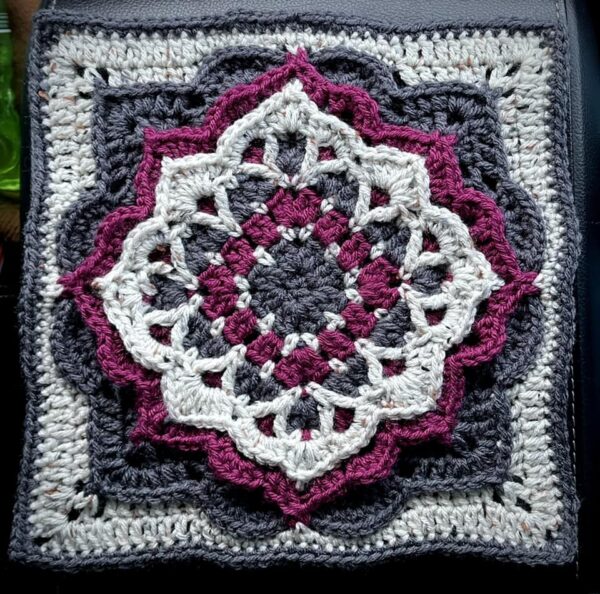
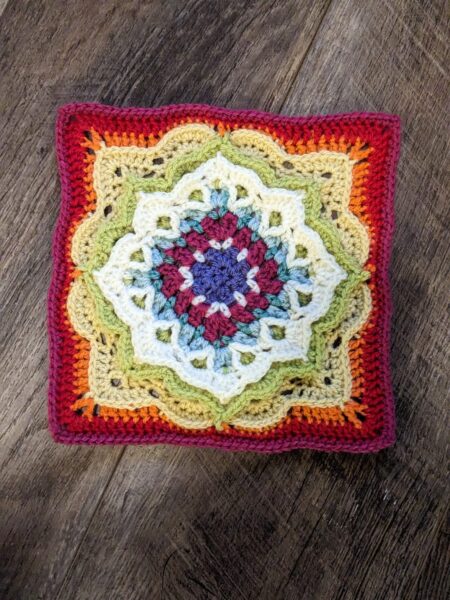
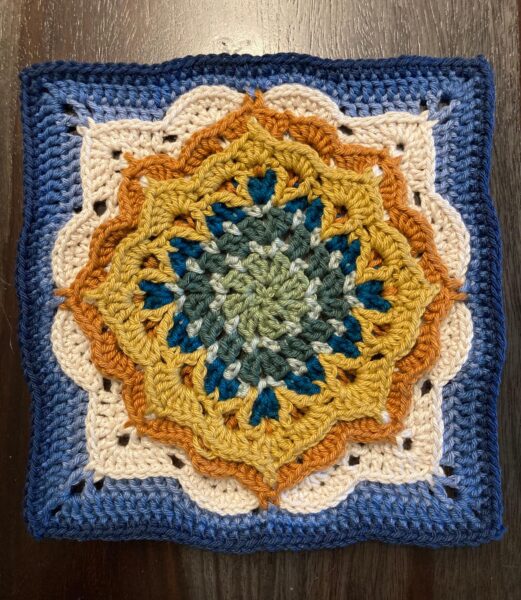
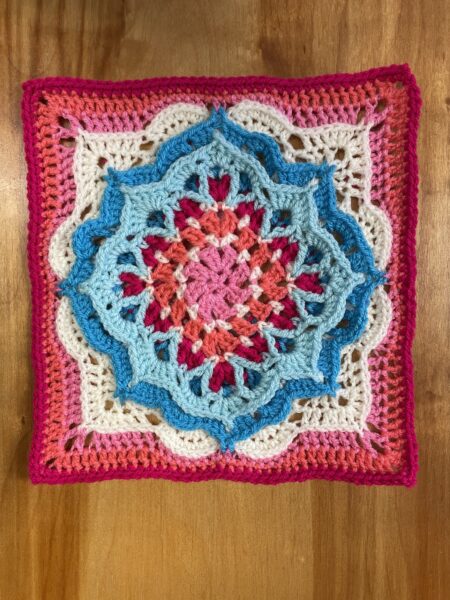
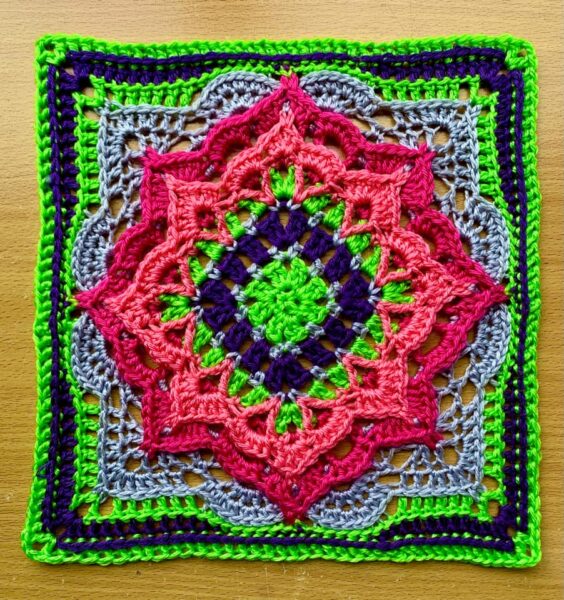
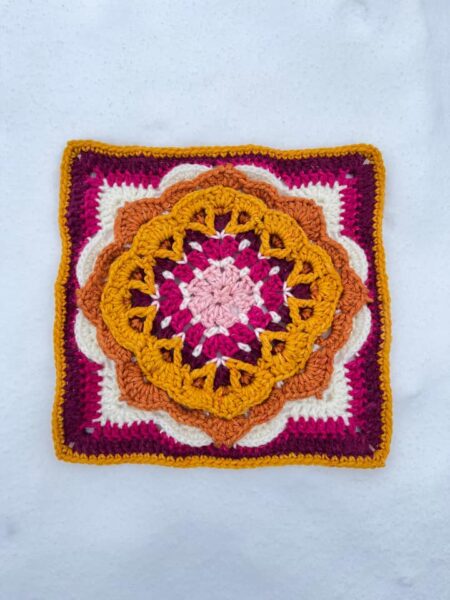
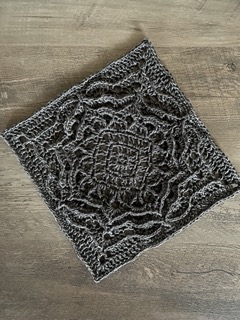
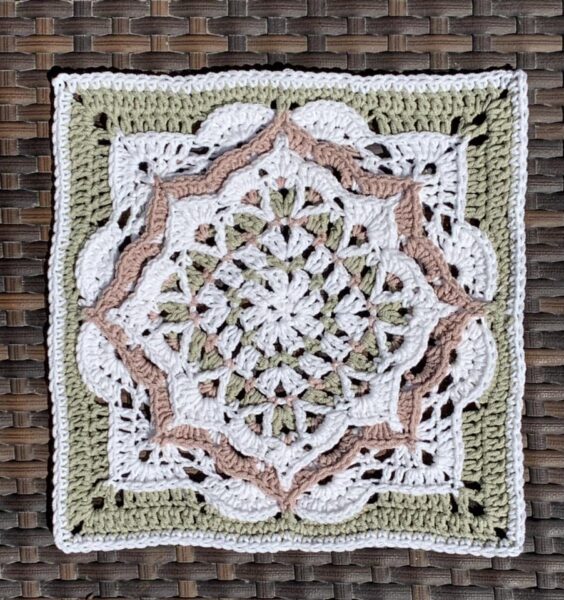
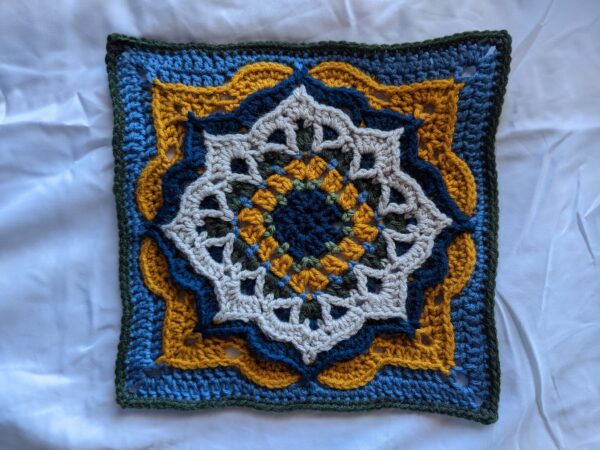
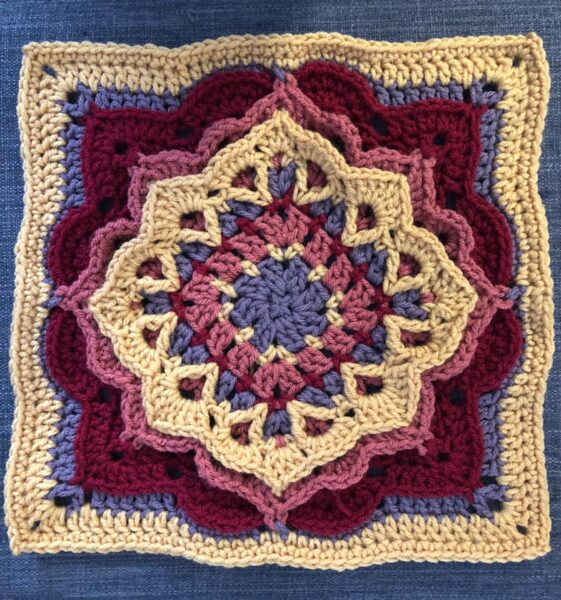
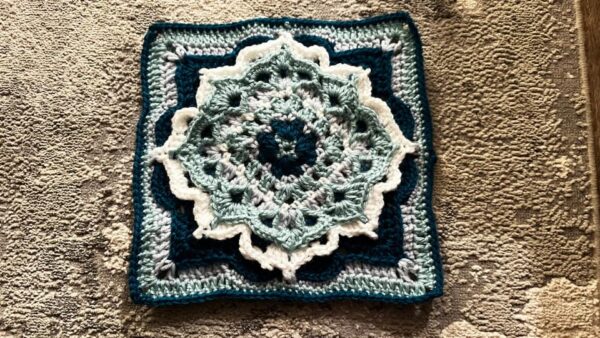
If you’d like some color inspiration, take a look at the testers’ versions in the gallery below.
Notes
This pattern is Copyright © 2023 Polly Plum. All rights reserved.
If you would like to share this pattern, please share the link to this webpage or the Ravelry pattern page (link below). Please do not distribute this pattern or photos in any other form. Please read more in the Copyright section.
Ravelry: Click here to favorite, queue, and hook up a project page for this pattern on Ravelry.
Etsy: Click here to favorite the pattern on Etsy.
Print Friendly: At the bottom of the page there is now a “print friendly” button. It’s really easy to use! Just click it and a window will open that gives you the option to click on the things you don’t want to print to make them go away. That way you print just pattern and save yourself some ink or toner.
Help: If you need help or have any questions, scroll to the bottom of this page. There are links to where you can find lots of support. Remember, there’s lots of tips and photos in the paid PDF to help you along your way too.
Abbreviations
- ch – chain
- dc – double crochet
- hdc – half double crochet
- mc – magic circle
- r(#) – round/row number
- sc – single crochet
- sk – skip
- slst – slip stitch
- sp – space
- st – stitch
- tr – treble crochet
- yo – yarn over
Special Stitches:
3LO – Do not work into either of the top two loops, instead work into the loop that lands just under/behind the back loop. {Click here to see my explanation and photo tutorial for 3LO}
Picot – ch3, slst to back bump of first ch
WV – {wide V stitch} dc, ch2, dc
Standing Stitches:
Note: Standing stitches are totally optional! See the note in italics at the end of each standing stitch for the alternative beginning stitch.
Standing dc – to start a round, with slip knot on hook, hold slip knot in place with thumb or finger, yo and hold that in place too, insert hook in indicated stitch, yo and pull up a loop, carefully yo and draw yarn through two loops on hook twice {alternately, slst to join yarn then ch3 to count as your first dc}
Standing hdc – to start a round, with slip knot on hook, hold slip knot in place with thumb or finger, yo and hold that in place too, insert hook in indicated stitch, yo and pull up a loop, carefully yo and draw yarn through all three loops on hook {alternately, slst to join yarn then ch2 to count as your first hdc}
Standing sc – to start a round, with slip knot on hook, insert hook into indicated stitch, yo and pull up a loop, yo and pull through two loops on hook
Standing tr – to start a round, with slip knot on hook, hold slip knot in place with thumb or finger, yo twice and hold that in place too, insert hook in indicated stitch, yo and pull up a loop, [carefully yo and draw yarn through two loops on hook] three times {alternately, slst to join yarn then ch4 to count as your first tr}
Pattern
Round 1
Magic circle start: Begin with mc. Ch1, [sc in mc, ch2] 4 times. Close mc. Slst to first sc to join.
Alternatively, Chain loop start: Ch4, slst to first ch to form loop. Ch1, [sc in ch loop, ch2] 4 times. Slst to first sc to join. {Tip: when weaving ends, use the end from the chain loop to close the very center of the loop by weaving it under the 4sc and pulling it tight.}
12 st around (4 sc, 4 ch2 sp)
Tip: Throughout the pattern watch that your chain spaces don’t get too tight.
Note: R1 ch2 sps, and successive ch sps, count as the corners through rnd 13.
Round 2
Sk all sts, work only into ch sps.
With new color: In any ch2 sp (standing dc, dc, ch2, 2dc), ch1.
Or, with same color: Slst into next ch2 sp, ch3 {counts as first dc here and throughout}, (dc, ch2, 2dc) in same sp, ch1.
[(2dc, ch2, 2dc) in next ch2 sp, ch1] 3 times. Slst to first dc to join.
28 st around (16 dc, 4 ch2 sp, 4 ch1 sp)
Round 3
Sk all sts, work only into ch sps.
With new color: In any ch2 sp (standing sc, ch2, sc).
Or, with same color: Slst into next dc and next ch2 sp, ch1, (sc, ch2, sc) in same sp.
*^Ch2, sc in next ch1 sp, ch2,^ (sc, ch2, sc) in next ch2 sp.*
Repeat from * to * twice more and from ^ to ^ once more. Slst to first sc to join.
36 st around (12 sc, 12 ch2 sp)
Round 4
Sk all sts, work only into ch sps.
With new color: In any corner ch2 sp (standing dc, dc, ch2, 2dc).
Or, with same color: Slst into next ch2 sp, ch3, (dc, ch2, 2dc) in same sp.
*^Ch1, [2dc in next ch2 sp, ch1] twice,^ (2dc, ch2, 2dc) in corner ch2 sp.*
Repeat from * to * twice more and from ^ to ^ once more. Slst to first dc to join.
52 st around (32 dc, 4 ch2 sp, 12 ch1 sp)
Round 5
Sk all sts, work only into ch sps.
With new color: In any corner ch2 sp (standing sc, ch2, sc).
Or, with same color: Slst into next dc and next ch2 sp, ch1, (sc, ch2, sc) in same sp.
*^Ch2, [sc in next ch1 sp, ch2] 3 times,^ (sc, ch2, sc) in next ch2 sp.*
Repeat from * to * twice more and from ^ to ^ once more. Slst to first sc to join.
60 st around (20 sc, 20 ch2 sp)
Round 6
Sk all sts, work only into ch sps.
With new color: In any corner ch2 sp (standing dc, dc, ch2, 2dc).
Or, with same color: Slst into next ch2 sp, ch3, (dc, ch2, 2dc) in same sp.
*^Ch1, [2dc in next ch2 sp, ch1] 4 times,^ (2dc, ch2, 2dc) in corner ch2 sp.*
Repeat from * to * twice more and from ^ to ^ once more. Slst to first dc to join.
76 st around (48 dc, 4 ch2 sp, 20 ch1 sp)
Round 7
Forget everything you know about stitch placement and buckle up. Work only into r6 ch sps and r5 sc. Keep all sts in front of r6.
With new color: In any r6 corner ch2 sp (standing sc, ch2, sc).
Or, with same color: Slst into next dc and next ch2 sp, ch1, (sc, ch2, sc) in same sp.
*^(Tr, ch3, tr) in next r5 sc, [sk the r6 ch1 sp behind the sts just made, sc in next r6 ch1 sp, sk the r5 sc below the sc just made, (tr, ch3, tr) in next r5 sc] twice,^ (sc, ch2, sc) in r6 corner ch2 sp.*
Repeat from * to * twice more and from ^ to ^ once more. Slst to first sc to join.
84 st around (24 tr, 16 sc, 12 ch3 sp, 4 ch2 sp)
Round 8
Sk all sts, work only into r7 ch sps.
With new color: In corner ch2 sp (standing dc, dc, picot, 2dc).
Or, with same color: Slst into next ch2 sp, ch3, (dc, picot, 2dc) in same sp.
*^6hdc in next ch3 sp, (4dc, picot, 4dc) in next ch3 sp, 6hdc in next ch3 sp,^ (2dc, picot, 2dc) in corner ch2 sp.*
Repeat from * to * twice more and from ^ to ^ once more. Slst to first dc to join. FASTEN OFF.
104 st around (8 picot, 48 dc, 48 hdc)
Round 9
Work only into r6 ch sps. Keep all r9 sts behind other rnds.
With new color: In any r6 corner ch2 sp working BETWEEN the two r7 sc and BEHIND r8 (standing tr, ch4, tr).
*^Ch1, (tr, ch4, tr) in next ch1 sp, ch1, [sk next ch1 sp {with a r7 sc in it}, (tr, ch4, tr) in next ch1 sp, ch1] twice,^ (tr, ch4, tr) in corner ch2 sp working between r7 sc.*
Repeat from * to * twice more and from ^ to ^ once more. Slst to first tr to join.
112 st around (32 tr, 16 ch4 sp, 16 ch1 sp)
Round 10
Sk all sts and ch1 sps, work only into r9 ch4 sps.
With new color: In any corner ch4 sp (standing dc, 2dc, picot, 3dc).
Or, with same color: Slst into corner ch4 sp, ch3, (2dc, picot, 3dc) in same sp.
*^6hdc in next ch4 sp, (5dc, picot, 5dc) in next ch4 sp, 6hdc in next ch4 sp,^ (3dc, picot, 3dc) in corner ch4 sp.*
Repeat from * to * twice more and from ^ to ^ once more. Slst to first dc to join. FASTEN OFF.
120 st around (8 picot, 64 dc, 48 hdc)
Round 11
Work only into r9 ch1 sps and r8 picots. Keep work behind r10.
With new color: Standing sc in center of any r8 corner picot by working UNDER the r10 picot and between r10 dc from the back of r10 {either insert your hook from back to front under the r10 picot, or pull the r8 picot to the back of your work between r10 dcs; do NOT work under entire arch; work into all picots this way this round}.
*^Ch1, [WV in next r9 ch1 sp, ch1] twice, WV in center of next r8 picot by working under the r10 picot, ch1, [WV in next r9 ch1 sp, ch1] twice,^ sc in next r8 picot by working under the r10 picot.*
Repeat from * to * twice more and from ^ to ^ once more. Slst to first sc to join.
108 st around (20 WV, 4 sc, 24 ch1 sp)
Round 12
Sk all r11 ch1 sps.
With new color: Standing sc in any sc.
Or, with same color: Ch1 and sc in same sc as join.
*^Ch1, 6hdc in ch2 sp of next WV, ch1, sc in ch2 sp of next WV, ch1, 2dc in next WV, WV in center of r10 picot, 2dc in same WV as last 2dc, ch1, sc in ch2 sp of next WV, ch1, 6hdc in ch2 sp of next WV, ch1,^ sc in next sc.*
Repeat from * to * twice more and from ^ to ^ once more. Slst to first sc to join.
116 st around (4 WV, 16 dc, 48 hdc, 12 sc, 24 ch1 sp)
Round 13
Sk all r12 ch1 sps. Be careful not to miss r12 hdc when they come immediately after a ch1 sp.
With new color: Standing sc in any sc between groups of 6hdc.
Or, with same color: Ch1 and sc in same sc as join.
*^Hdc in next hdc, 2hdc in next 4hdc, hdc in next hdc, sk next sc, dc in next 2dc, 2dc in next dc, (2dc, picot, 2dc) in next ch2 sp, 2dc in next dc, dc in next 2dc, sk next sc, hdc in next hdc, 2hdc in next 4hdc, hdc in next hdc,^ sc in next sc.*
Repeat from * to * twice more and from ^ to ^ once more. Slst to first sc to join. FASTEN OFF.
136 st around (4 picot, 48 dc, 80 hdc, 4 sc)
Note: See my post for instructions on using the third loop (3LO) and see the special stitches section for acceptable alternatives. Yes, it gives a cool effect, but if you hate it, don’t force yourself.
Round 14
Work all sts, except those made into picots, into the 3LO {see special sts}.
With new color: Standing sc in center of any open r10 picot.
*^Ch1, sk the r13 sc behind sc just made, sk next hdc, sc in next 7hdc, sk next 2hdc, dc in next 6dc, ch1, (dc, ch3, dc) in next picot {counts as new corner through end of pattern}, ch1, dc in next 6dc, sk next 2hdc, sc in next 7hdc, ch1, sk next hdc,^ sc in center of r10 picot.*
Repeat from * to * twice more and from ^ to ^ once more. Slst to first sc to join.
144 st around, 33 st per side not counting ch3 corners (56 dc, 60 sc, 4 ch3 sp, 16 ch1 sp)
Round 15
With new color: Standing sc in any sc made into a r10 picot.
Or, with same color: Ch1 and sc in same sc as join.
*^Sc in next ch1 sp, sc in next 5sc, hdc in next 2sc, dc in next 6dc, dc in next ch1 sp, dc in next dc, (2dc, ch2, 2dc) in next corner ch3 sp, dc in next dc, dc in next ch1 sp, dc in next 6dc, hdc in next 2sc, sc in next 5sc, sc in next ch1 sp,^ sc in next sc.*
Repeat from * to * twice more and from ^ to ^ once more. Slst to first sc to join.
156 st around, 37 st per side not counting ch2 corners (80 dc, 16 hdc, 52 sc, 4 ch2 sp)
Round 16
With new color: Standing sc in center sc of any side.
Or, with same color: Ch1 and sc in same sc as join.
*Sc in each st across to next corner ch2 sp, (sc, ch2 sc) in next corner ch2 sp.*
Repeat from * to * three times more. Sc in each st across to first sc. Slst to first sc to join. Fasten off.
164 st around, 39 st per side (156 sc, 4 ch2 sp)
Weave in all ends and block.
Credits
Original crochet pattern design – Polly Plum
Photography and graphic design – Polly Plum
Testers:
If you’d like to show your support and/or say thank you for this free pattern – the most helpful thing you can do is share a picture of your work on Ravelry or Facebook. Seriously! That’s it. If you liked the pattern, tell your friends and show them what you made.
If you loved the pattern and want to make more, check out the Patterns page here on Every Trick on the Hook or my Ravelry store.
The best way to keep up with my goings-on is to follow Every Trick on the Hook on Facebook. You can also message me there, post on the wall, and follow my posts for the latest news.
If you’re looking for a more interactive Facebook experience, join the Polly Plum Pattern Posse Facebook group. We’re a fun and supportive group. Really! There’s so much help there that chances are your question will be answered by someone before I even see it. It’s the best place to go with a question. It’s also a great place to share your Polly Plum makes and see what others are making.
If Facebook isn’t your thing you can also join the Ravelry group – Polly’s Place or follow @polly_plum_crochet on Instagram.

Leave a Reply