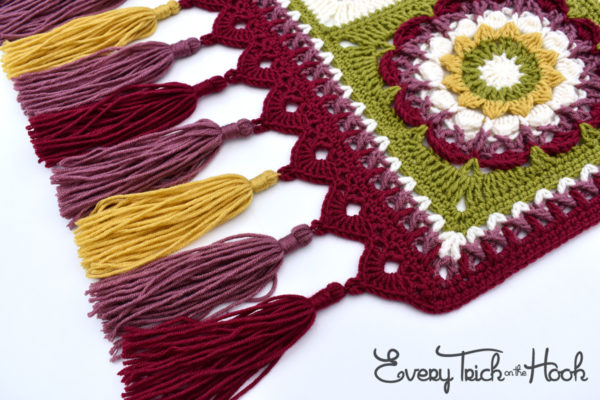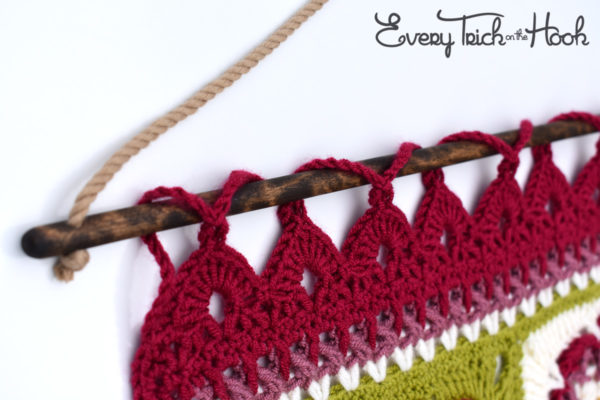
The Magic Carpet Edge is a two-sided edge pattern that lends itself well to adding special elements like tassels or for hanging your work like a tapestry.
Two versions are presented. First, as in the picture above with more defined corners. Second, the placement of the shells is moved for flush edges and no corners.
Click here to favorite, queue, and hook up a project page on Ravelry.
Details
Pattern written in UK crochet terms (click here for US terms)
Skill level: Easy
Finished Size: N/A, will depend on your project and yarn used
Hook size: Use the same hook you used for your base project
Yarn: Same yarn as used for your base project
Notes
This pattern is Copyright © 2018 Polly Plum. All rights reserved.
If you would like to share this pattern, please share the link to this webpage or the Ravelry pattern page (link below). Please do not distribute this pattern or photos in any other form. Please read more in the Copyright section.
At the bottom of the page there is now a “print friendly” button. It’s really easy to use! Just click it and a window will open that gives you the option to click on the things you don’t want to print to make them go away. That way you print just pattern and save yourself some ink or toner.
If you need help or have any questions, scroll to the bottom of this page. There are links to where you can find lots of support.
Abbreviations
- ch – chain
- dc – double crochet
- hdc – half double crochet
- r(#) – round number
- sk – skip
- slst – slip stitch
- sp – space
- st– stitch
- tr – treble crochet
- yo – yarn over
Special Stitches
Standing dc – to start a round, with slip knot on hook, insert hook into indicated stitch, yo and pull up a loop, yo and pull through two loops on hook
Picot – ch4, slst by inserting hook from top to bottom under the front loop of the last dc and the loop just below that one
V – tr, ch1, tr
XWV – tr, ch3, tr
Invisible Join – recommended for best results, see video tutorial:
Pattern – Standard
Note: you’re currently using the UK terms pattern. Click here to go to US terms.
Begin with a base stitch count of 8x + 3 plus either a corner ch2 sp or a corner st {will be referred to as “corner”} on the two sides where your edge will be made, stitch counts for the straight sides does not matter. Base st count of 8x + 2 also works, simply modify by not skipping the last stitch on the edged sides in round 1. Base st count of 8x + 4 also works, simply modify by skipping 2 stitches before first V of round 1 on each edged side.
Round 1: Standing dc in corner before an edged side, dc again in corner. *Sk next st, V in next st, [sk next st, dc in next st, sk next st, XWV in next st, sk next st, dc in next st, sk next st, V in next st,] repeat across to last st before corner, sk last st, 2dc in corner, dc in each st across to next corner,* 2dc in corner. Repeat from * to * once more. Slst to first dc to join {use an invisible join for best result}. Fasten off.
Round 2: {For best results, do not use a slip knot to start, simply hold the loose yarn against your hook for the first slst and leave the end loose and weave it in later in the same manner as an invisible join}. Slst in first dc of corner, dc in second dc of corner, dc in first tr of first V. 2dc in ch1 of first V, [(5tr, picot, 5tr) into ch3 sp of next XWV, dc in ch1 of next V] repeat across side to last V, dc again in last V {total of 2 dc in last V}, dc in second tr of last V, dc in first dc of corner, slst in second dc of corner. Fasten off {use invisible join for best result}. Repeat on opposite side.
Pattern – Flush Edges
Use the same stitch count as required for the standard version.
Round 1: Standing dc in corner before an edged side, dc again in corner. *Sk next st, XWV in next st, [sk next st, dc in next st, sk next st, V in next st, sk next st, dc in next st, sk next st, XWV in next st,] repeat across to last st before corner, sk last st, 2dc in corner, dc in each st across to next corner,* 2dc in corner. Repeat from * to * once more. Slst to first dc to join {use an invisible join for best result}. Fasten off.
Round 2: {For best results, do not use a slip knot to start, simply hold the loose yarn against your hook for the first slst and leave the end loose and weave it in later in the same manner as an invisible join}. Slst in first dc of corner, dc in second dc of corner, ch1. (5tr, picot, 5tr) into ch3 sp of next XWV, [dc in ch1 of next V, (5tr, picot, 5tr) into ch3 sp of next XWV] repeat across side to next corner, ch1, dc in first dc of corner, slst in second dc of corner. Fasten off {use invisible join for best result}. Repeat on opposite side.
Tassels
The picots are great for hanging tassels. Click here to see my photo tutorial on how to make your own tassels.
Hanging a Project
To hang using the standard version: Slst to the corner st, ch15, slst to the center of the next picot, [ch10, slst to the center of the next picot] across, ch15, slst to the corner st, fasten off, weave in ends.
To hang using the flush version: Slst to the first picot, [ch10, slst to the center of the next picot] across, fasten off, weave in ends.
Weave your the rod you’re using to hang your project in and out of the picots under the chains just made.

If you’d like to show your support and/or say thank you for this free pattern – the most helpful thing you can do is share a picture of your work on Ravelry or Facebook. Seriously! That’s it. If you liked the pattern, tell your friends and show them what you made.
If you loved the pattern and want to make more, check out the Patterns page here on Every Trick on the Hook or my Ravelry store.
The best way to keep up with my goings-on is to follow Every Trick on the Hook on Facebook. You can also message me there, post on the wall, and follow my posts for the latest news.
If you’re looking for a more interactive Facebook experience, join the Polly Plum Pattern Posse Facebook group. We’re a fun and supportive group. Really! There’s so much help there that chances are your question will be answered by someone before I even see it. It’s the best place to go with a question. It’s also a great place to share your Polly Plum makes and see what others are making.
If Facebook isn’t your thing you can also join the Ravelry group – Polly’s Place or follow @polly_plum_crochet on Instagram.
