Like anything, magic circles have a loyal fan club and a group who feel somewhat less love for them. To put it lightly. If you’ve never tried one, they are definitely worth giving a couple goes before writing them off entirely. If you have yet to master them, I’ve got some tips for you.
First off, the biggest argument and outright complaint against them is that they come undone. And it’s true. They do. Sometimes. There are a few factors that play into that. Mostly I’ve found that they aren’t great for stitches that are slightly loose. I made one afghan with worsted weight and a 6.0 mm hook and ALL twenty magic circles started to come undone before I could even work in the ends. Lucky me, I hadn’t worked in the ends so I was able to save it. Still incredibly frustrating.
There’s a pretty simple solution to this problem: double up the circle. But that does make them a little more difficult to work with.
That’s the second problem with magic circles. They can be a real pain to master. I’m going to try and help with that and show how to easily, very easily, double up that circle for what I’ve found to be a much more secure method.
Let’s try this with ideal conditions, worsted weight yarn and a 5.5 mm hook.
Check out the video tutorial here, or scroll down for the photo tutorial.
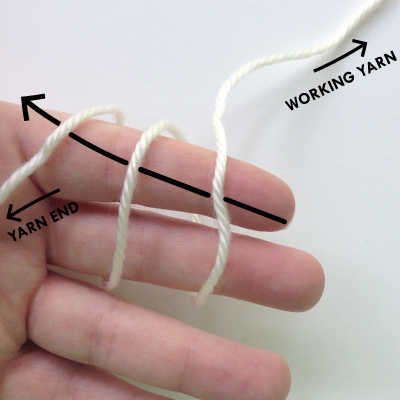
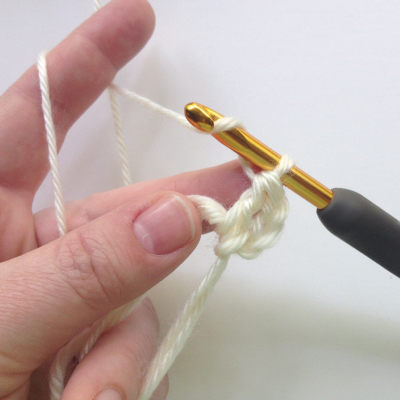
First off, wrap that yarn around your fingers, not once, but twice. Like so:
Stick your hook through the loops in the direction of the arrow (above).
Bring the loops of yarn together and pinch them like this:
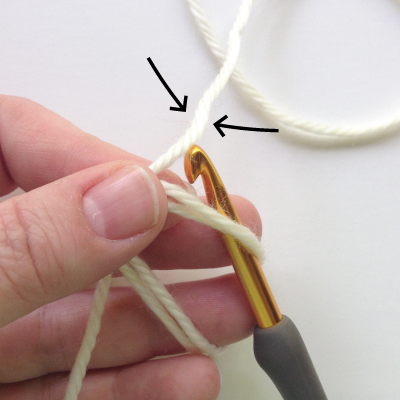
Now, see (above) the yarn the arrows are pointing to? Yes, your working yarn. Grab that with your hook and pull it through the double circle. Notice that my ring finger is in the loop stretching out the bottom of it? Fancy finger work! It helps me steady the loop.
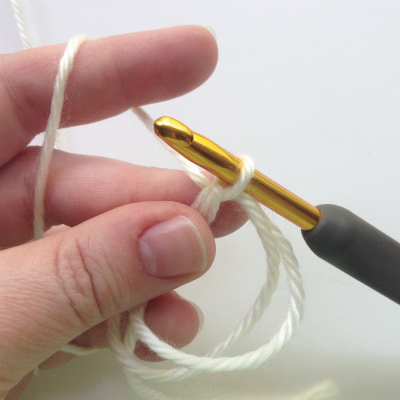
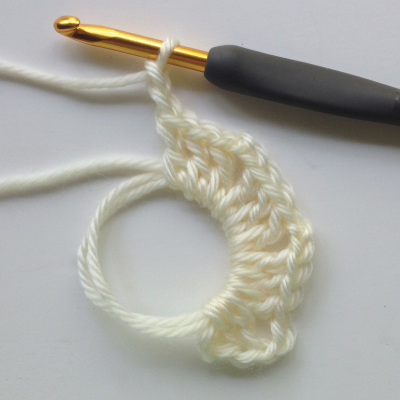
You’ve just made a magic circle! But the trickiest part is coming – working into the circle. I’ll be honest, they are flimsy and floppy. There is no body to them so they are hard to work into. I’ll show you what I do to keep them steady so that I can make nice even stitches.
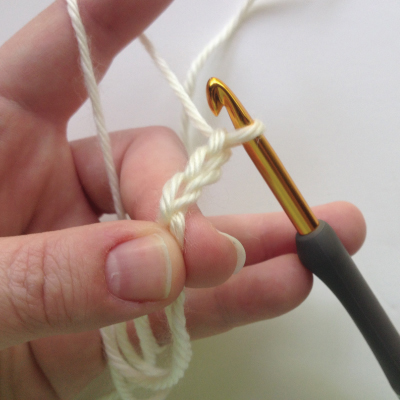
Look (below) at how my thumb and finger are pinching the double circle. That’s how I keep the circle sturdy while work into it. I’m also keeping the working yarn taut with my index finger just like I would if I were making normal stitches. But it becomes increasingly important right now as the working yarn is very slack against the loops of the magic circle.
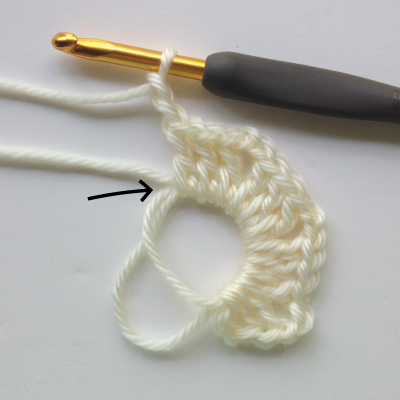
Okay, time for some more fancy finger work. Move your thumb and finger so that they pinch the magic circle on both sides of the loop you just pulled up. Now you can make your starting chains. As many as your pattern calls for. Mine called for 3.
You can let go of the right side of the circle now and work your stitches, but keep the left side pinched as you work. Like this:
Look at my ring finger (above). It’s also helping steady the circle by keeping it taut. I didn’t even realize I did that until today!
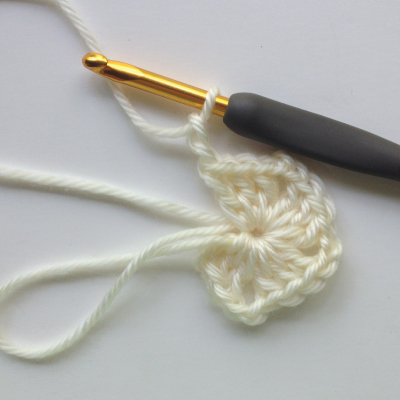
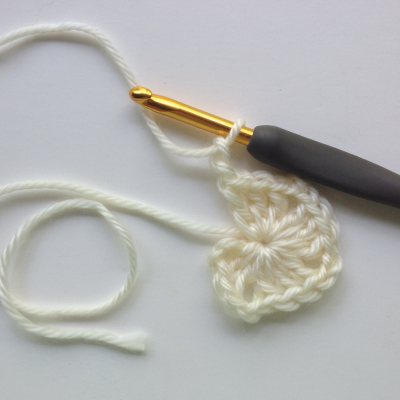
Once you’ve got all your stitches worked into the circle it might look a little something like this:
Closing this circle takes a couple little steps more than a normal magic circle because it’s doubled. You can’t just pull on the tail and close it. That extra loop will get caught and stick out. So here is how you close it. First, pull on the tail just a little bit so that the first loop starts to close. It will look like this:
See how one loop got smaller? That is the outer loop. Grab that loop and pull on it from the top where the arrow is (above). You’ll know you’ve got it right because the other loop will tighten. If it doesn’t and the tail starts to shorten, you’re pulling the wrong side. When you know you’re pulling at the right spot, go ahead and tighten it so it looks like this:
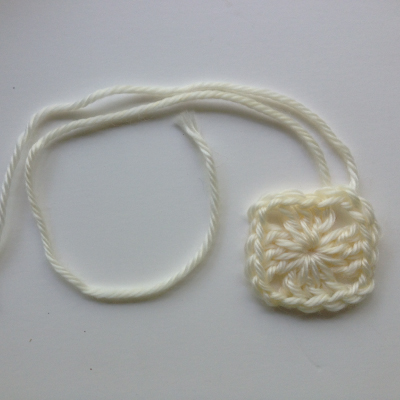
Now you can pull on the tail and close that loop. Join to your starting chain and you’re off!
Voila! A perfect double magic circle.
Some final notes: I’ve heard probably a hundred different recommendations on how to weave in your ends after a magic circle. Knot it, don’t knot it, weave around and around and around the circle, weave back and forth in at least sixty different directions. Everyone seems to have their own method. I like to weave around the circle at least one or two times and then through the backs of my stitches in a couple different directions. And just to make myself feel better, I tend to weave in a nice long end so that if it ever does start to loosen, it wont come completely undone. That being said, I have yet to have a double magic circle come undone. Fingers crossed!
<3 Polly

Excellent tutorial. I haven’t tried the double circle because I couldn’t figure out how to get both loops to tighten. I’ll have to try this method.
Best tutorial for the magic circle I have seen! Thank you!
Love this tutorial – you made it so easy to follow along, and it works like a peach! I just finished a bag made of solid grannies, and this technique would have been so helpful had I found it before I started. I’ll definitely have to try this on the next one. Thanks for sharing!
Best tutorial that I’ve seen so far about the magic circle- and believe me, I’ve watched and read dozen upon dozen of tutorial!
This double circle is genius!
Thank you so much for your time and expertise 🌺
I can now do magic circles. Thank you very well explained Jan 2018
I liked your video very much. What l like best about this method is it takes the bulkyness away from the center and makes a much nicer looking center. Thank you
May God bless you. I was so excited to return to crocheting after years of being unable to. I have found it great for anxiety n depression. I found a pattern that started with this new ‘magic circle’, with no explanation! I had anxiety over this.😔 Until today! Thank you for the clear, slow and visual explanation . 💕
I love the name of your blog!
Thanks so much for the tutorial! I’ve been doing the magic circle and didn’t even know there was a double one, I can see how this will be much more secure.
Very good tutorial. You made it easy to follow. Thank you..